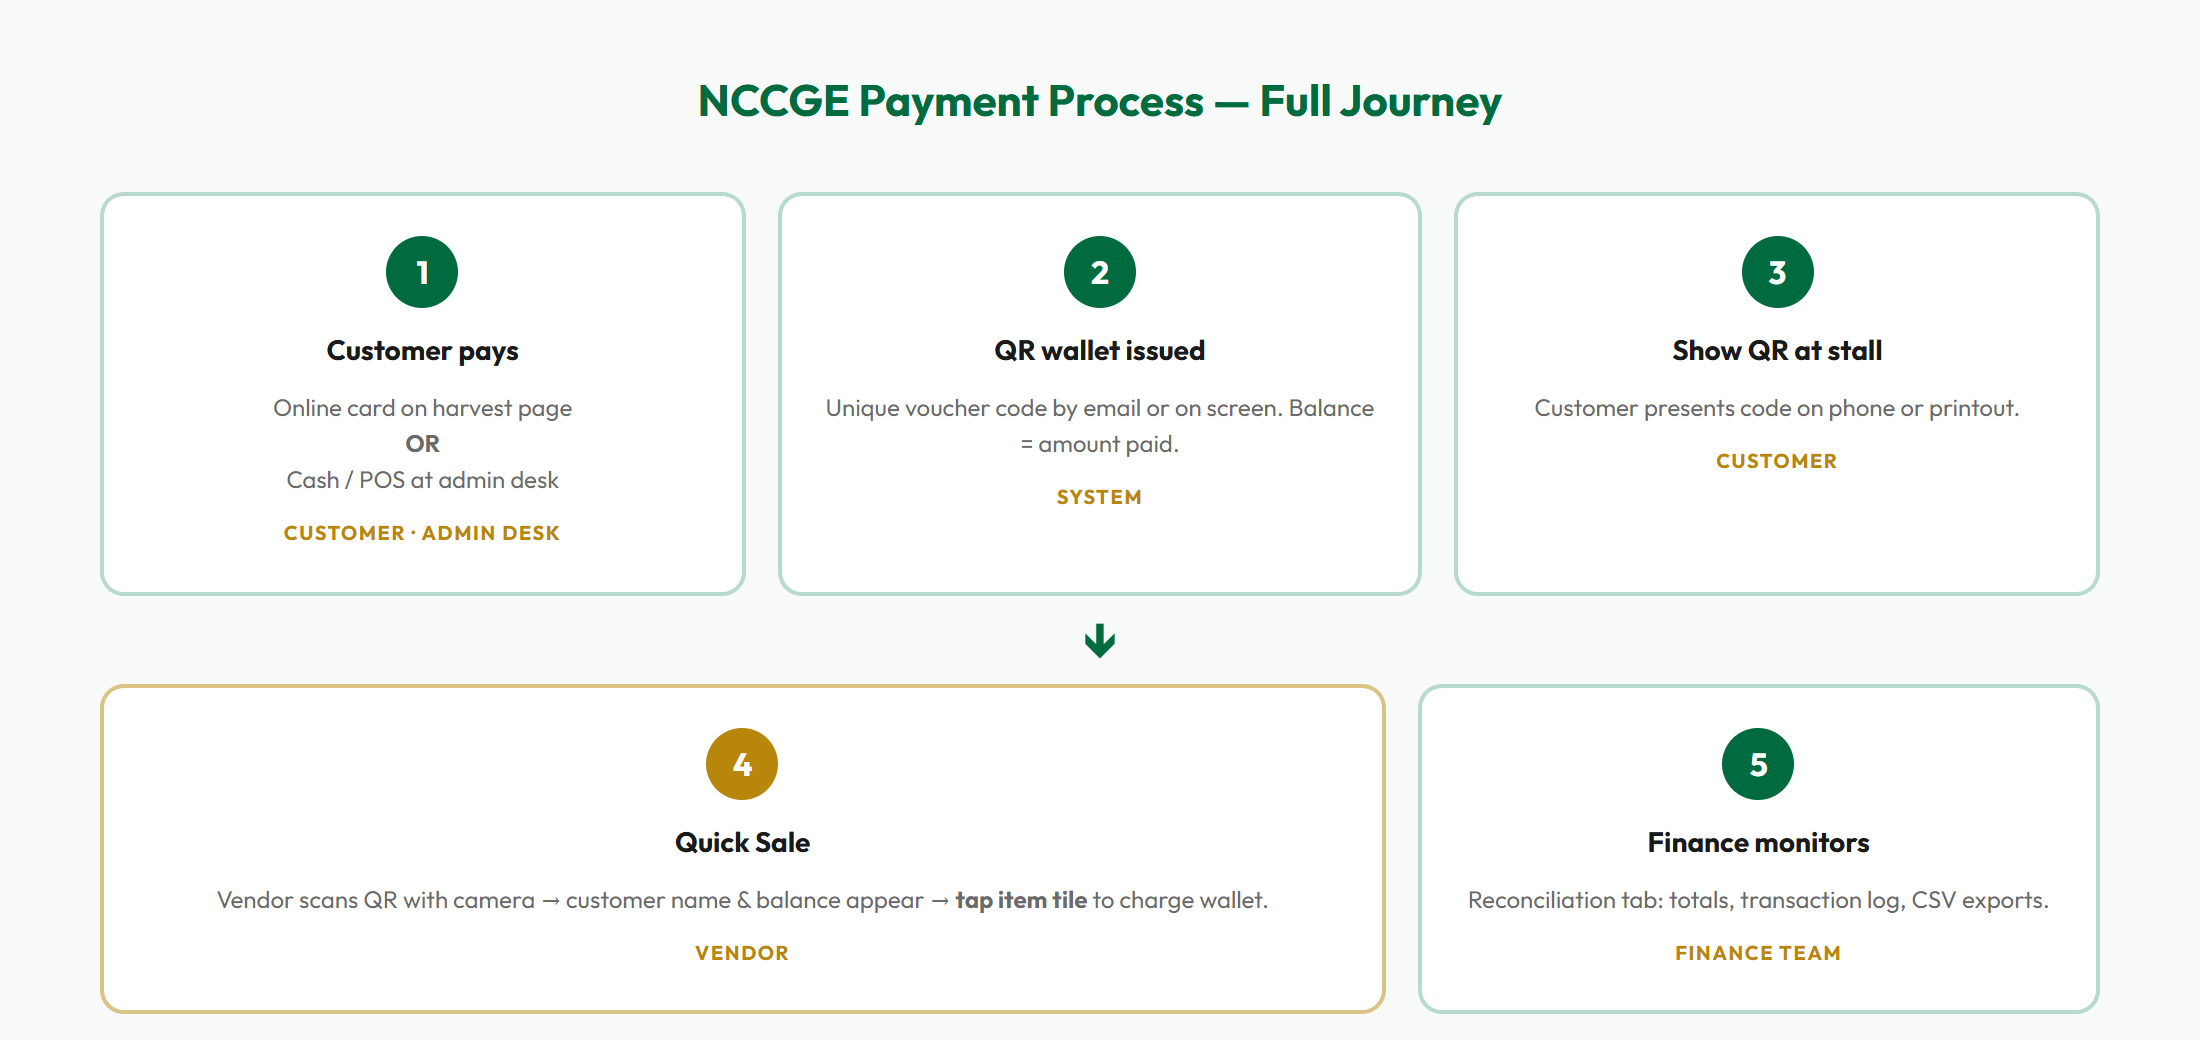
Figure 1 — The complete journey. Customer pays → QR issued → vendor Quick Sale → finance monitors in Admin.
STEP 1: CUSTOMER PAYS
├── Online (card on harvest page) ──► QR wallet created automatically
├── Online (existing wallet at checkout) ──► balance deducted; items pre-paid
└── On event day (cash/POS at desk) ──► Admin records payment ──► QR issued
STEP 2: CUSTOMER SHOPS AT STALL
└── Shows QR on phone (or paper printout) — pre-paid items handed over free
STEP 3: VENDOR AT STALL (Quick Sale)
└── Scan QR with camera → tap item tile → done
STEP 4: FINANCE MONITORS
└── Admin → Reconciliation → totals + export CSV files
4. Customer pays online
What community members do. Finance should know this to help customers.
Enter name & email; keep tab Pay by card; click Checkout →
Stripe secure card page opens
5
Pay by card
QR code on success page + email sent
6
Screenshot QR for event day
Show at any stall
Already have wallet credit? See 4B-2 below — the same checkout can deduct an existing balance instead of taking a new card payment.
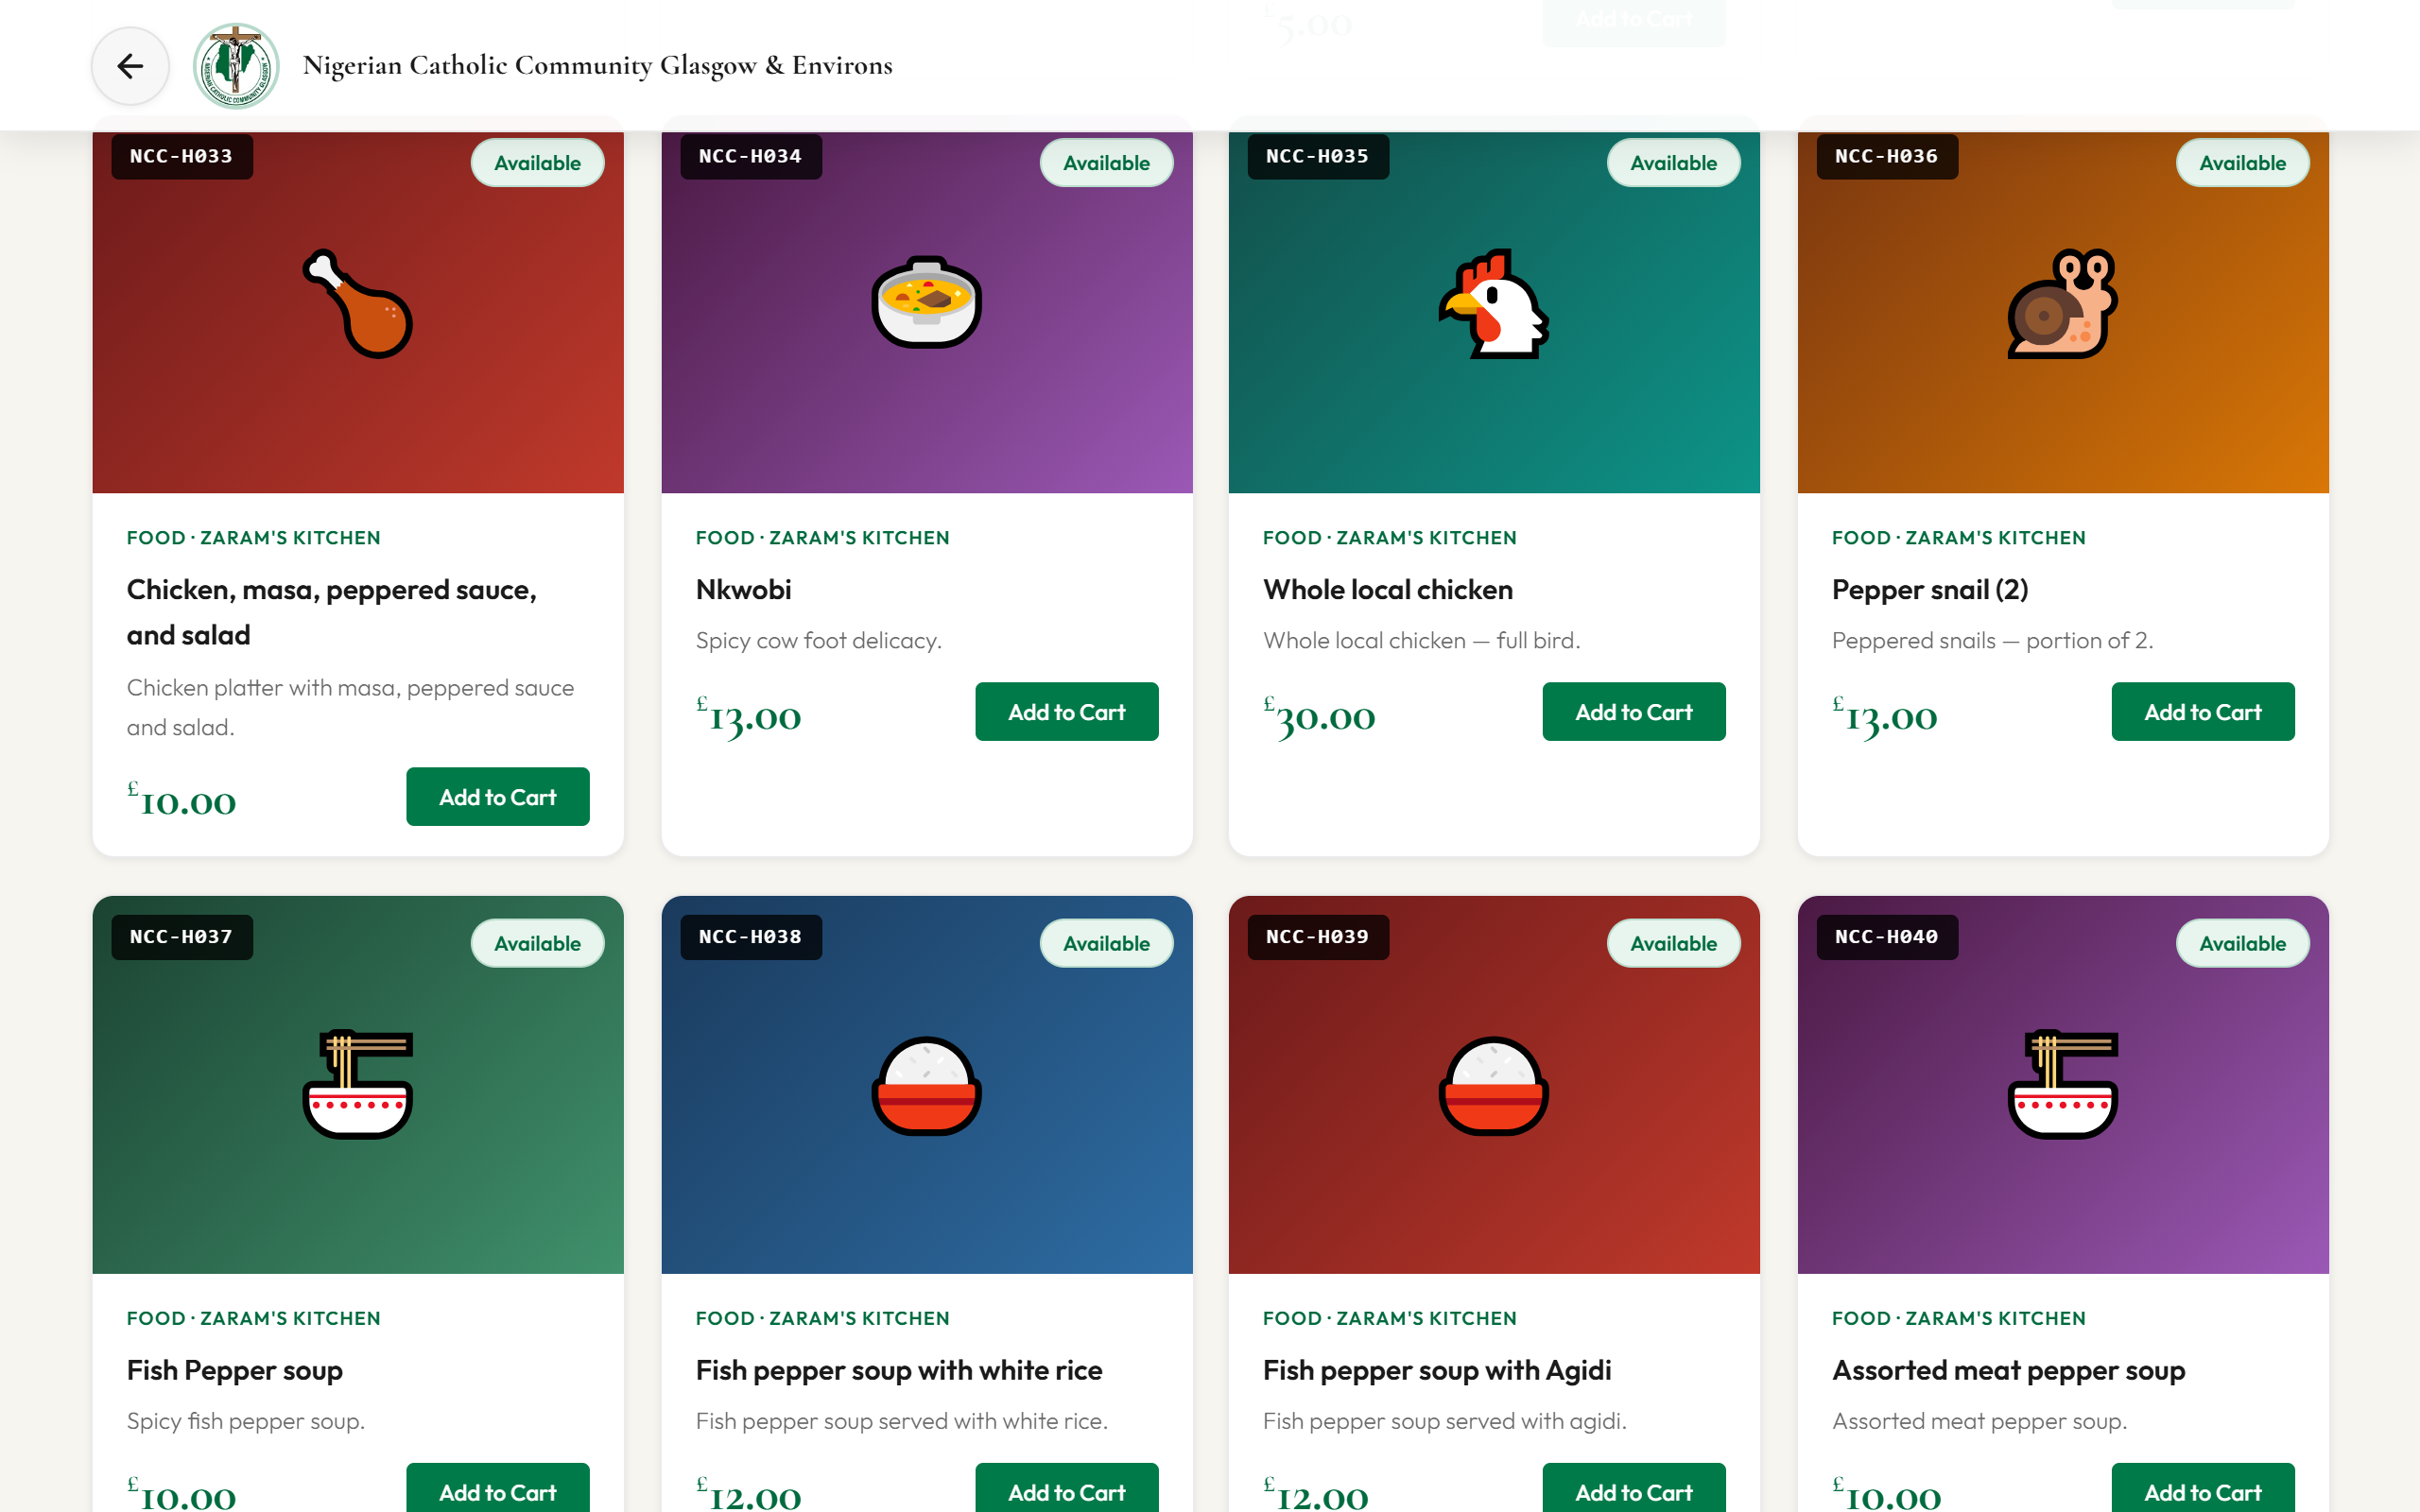
Figure 3a — Cart bar: click View Cart then Checkout.Figure 3b — Catalogue: Add to Cart on each item.
4B — Load a new wallet (flexible amount)
Figure 4 — Load Wallet. Open the modal → New top-up tab. Customer chooses amount (min £1), pays on Stripe, receives QR and voucher code on success page and by email.
On harvest.html, click Load Wallet.
Stay on tab New top-up.
Choose £10 / £25 / £50 / £100 or enter a custom amount (min £1).
Enter name and email; click Load Wallet →.
Pay on Stripe.
On success page: screenshot QR and note the voucher code (for balance check).
4B-2 — Pay for items from an existing wallet (no card needed)
New — July 2026. For customers who already loaded a wallet and now want to buy catalogue items (including Thanksgiving offerings) with that credit.
Step
What to do
What happens
1
Add items to cart on harvest.html; open Checkout
Checkout form appears
2
Switch payment tab to Pay with my QR wallet
Voucher panel opens
3
Enter voucher code — or Upload QR image / Scan with camera
Code fills in automatically from QR
4
Click Check balance
Name + balance shown; screen says if balance covers the cart
Vendor sees the pre-paid item and hands it over — no second charge
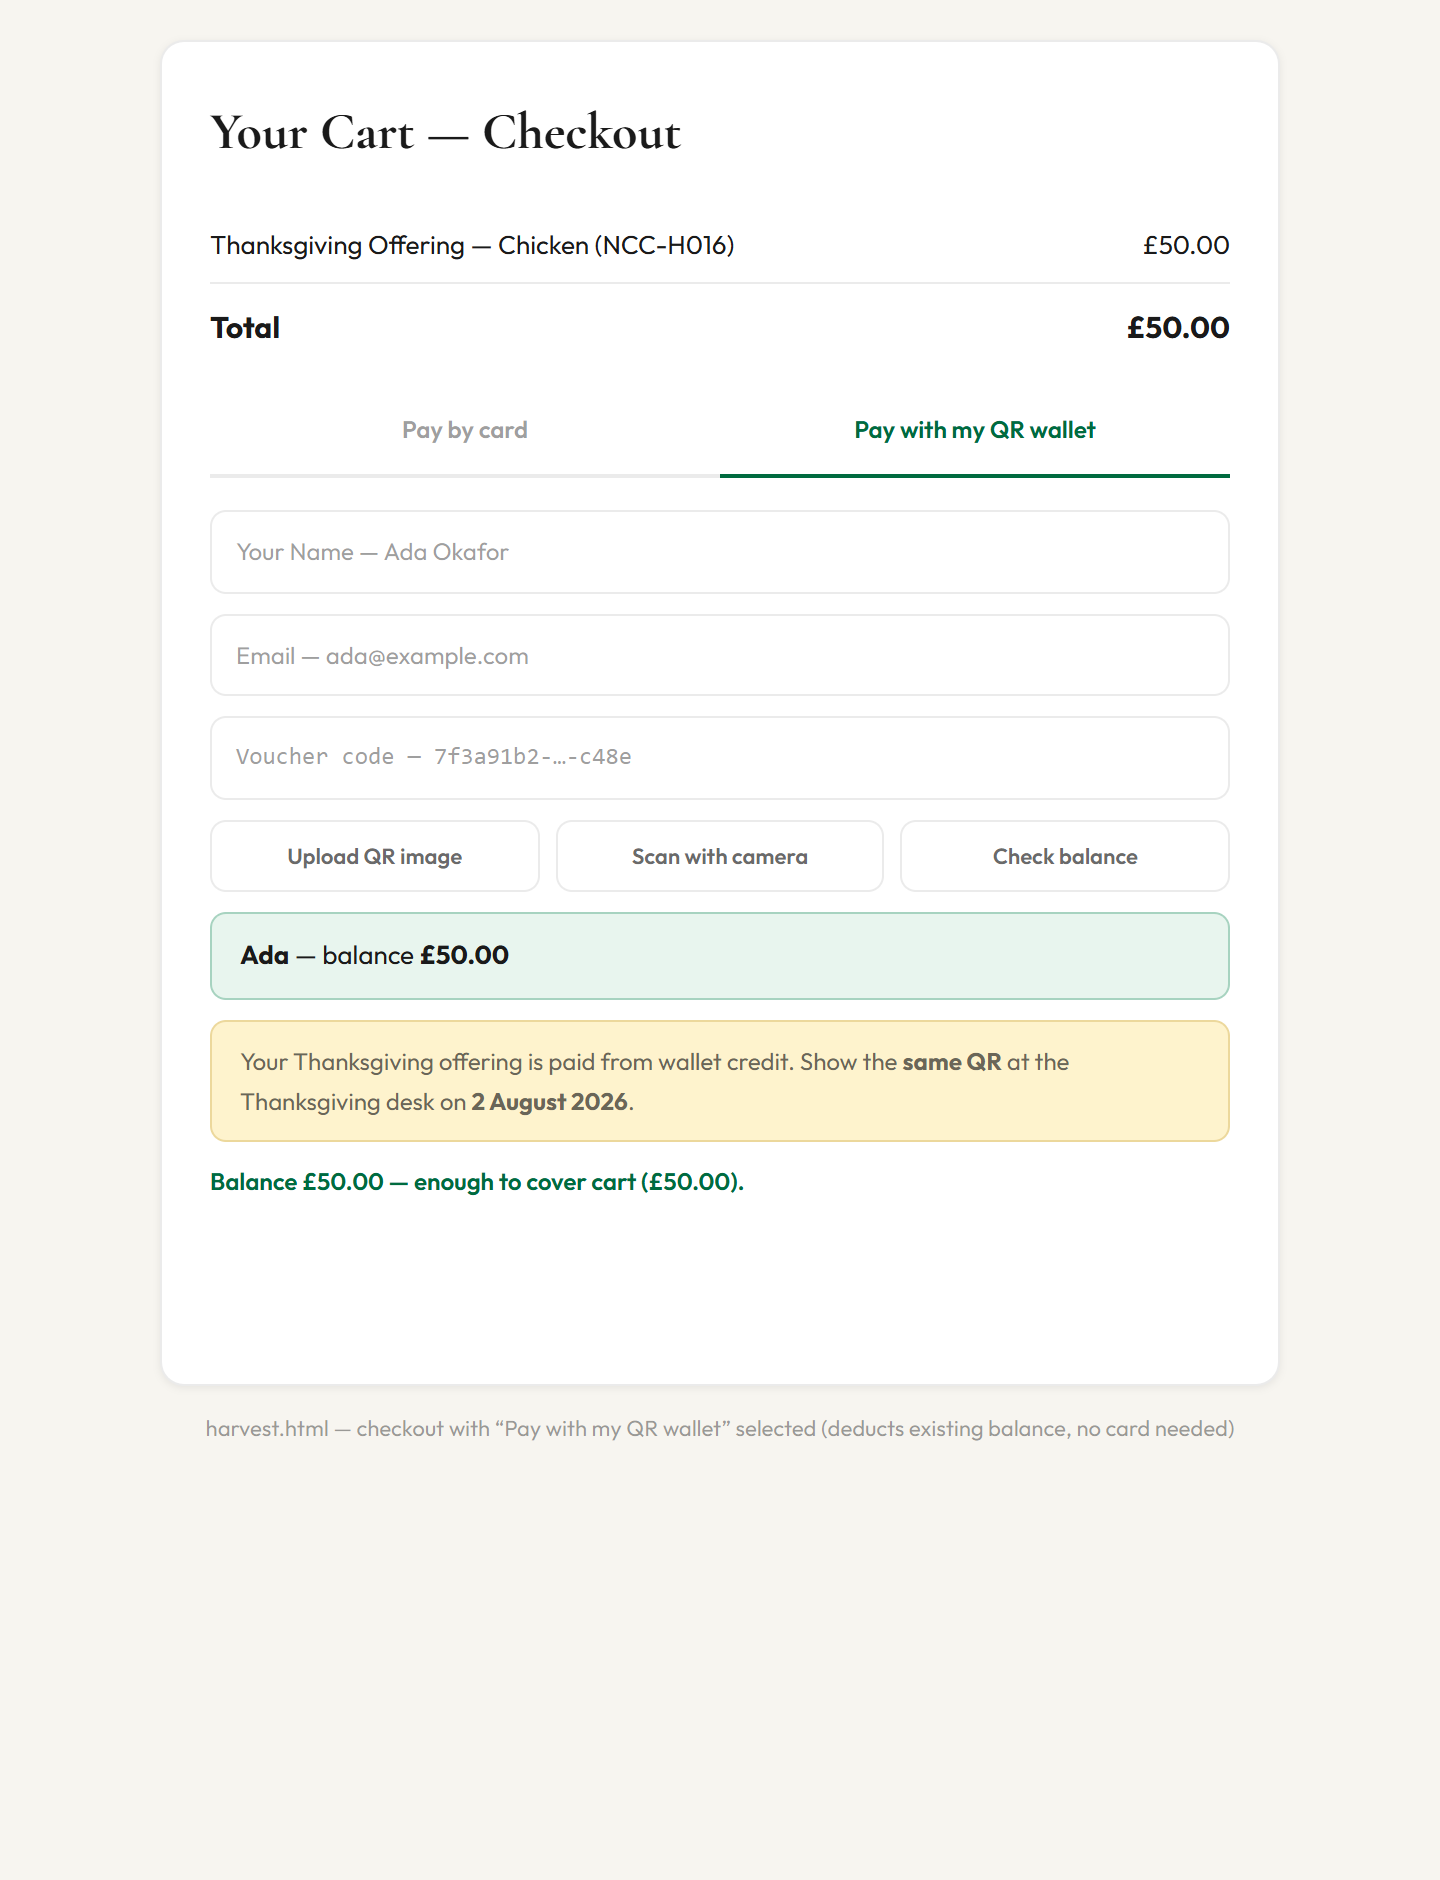
Figure 4a — Pay with my QR wallet. Balance check, Thanksgiving reminder, and pay button. The button stays disabled until the balance covers the cart.
Thanksgiving example: Ada loaded £50 last week. She adds the £50 Chicken offering to her cart, pays from her wallet, and her balance becomes £0. On 2 August the Thanksgiving desk scans her QR, sees “Pre-paid: Thanksgiving Offering — Chicken”, and hands it over free of charge.
4C — Top up an existing wallet (same QR)
On harvest.html → Load Wallet → tab Top up existing.
Paste the customer’s voucher code (from email or voucher.html).
Click Check voucher — confirm name and balance shown.
Enter name, email, amount (minimum £1).
Pay on Stripe — balance increases; QR and code stay the same.
Help customers: If they only have the QR image, open voucher.html from the link in their email, or ask admin desk to look up in QR Admin.
4D — Customer checks balance later
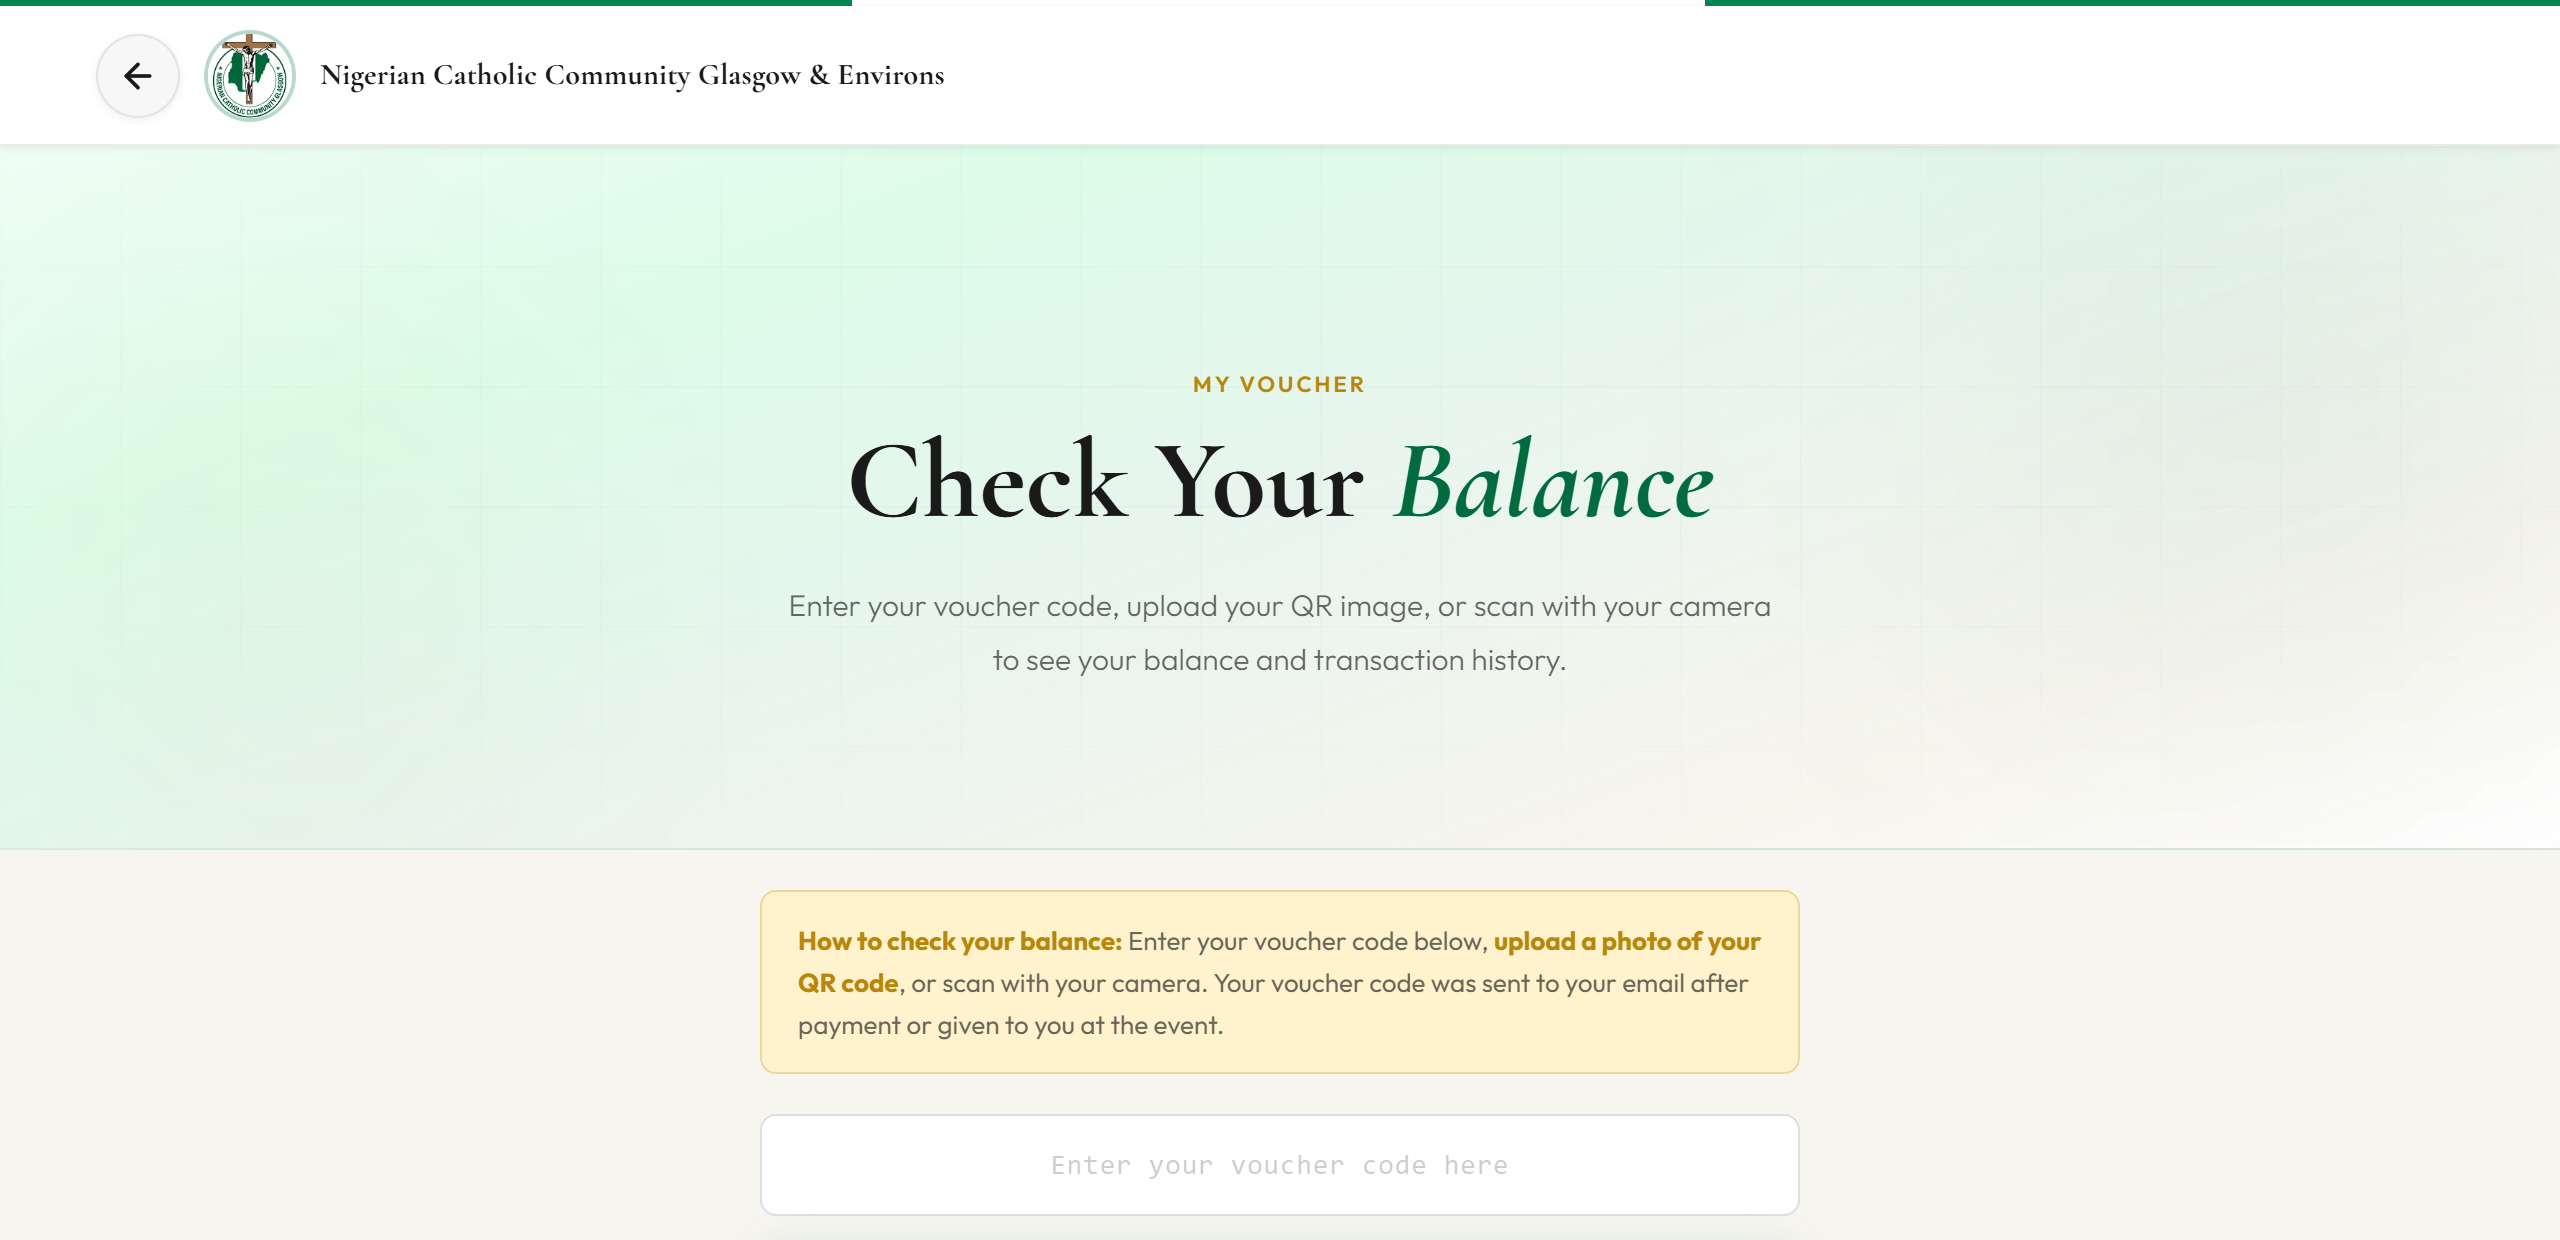
Figure 5 — Check balance (voucher.html). Customer enters voucher code to see remaining amount and history.
Go to voucher.html.
Enter voucher code from email, success page, or admin desk.
Click Check My Balance — see remaining amount, top-ups, and history.
Items paid online from wallet credit appear in a green “Pre-paid — collect at event” box until the stall hands them over.
4E — Donations (separate — not QR wallets)
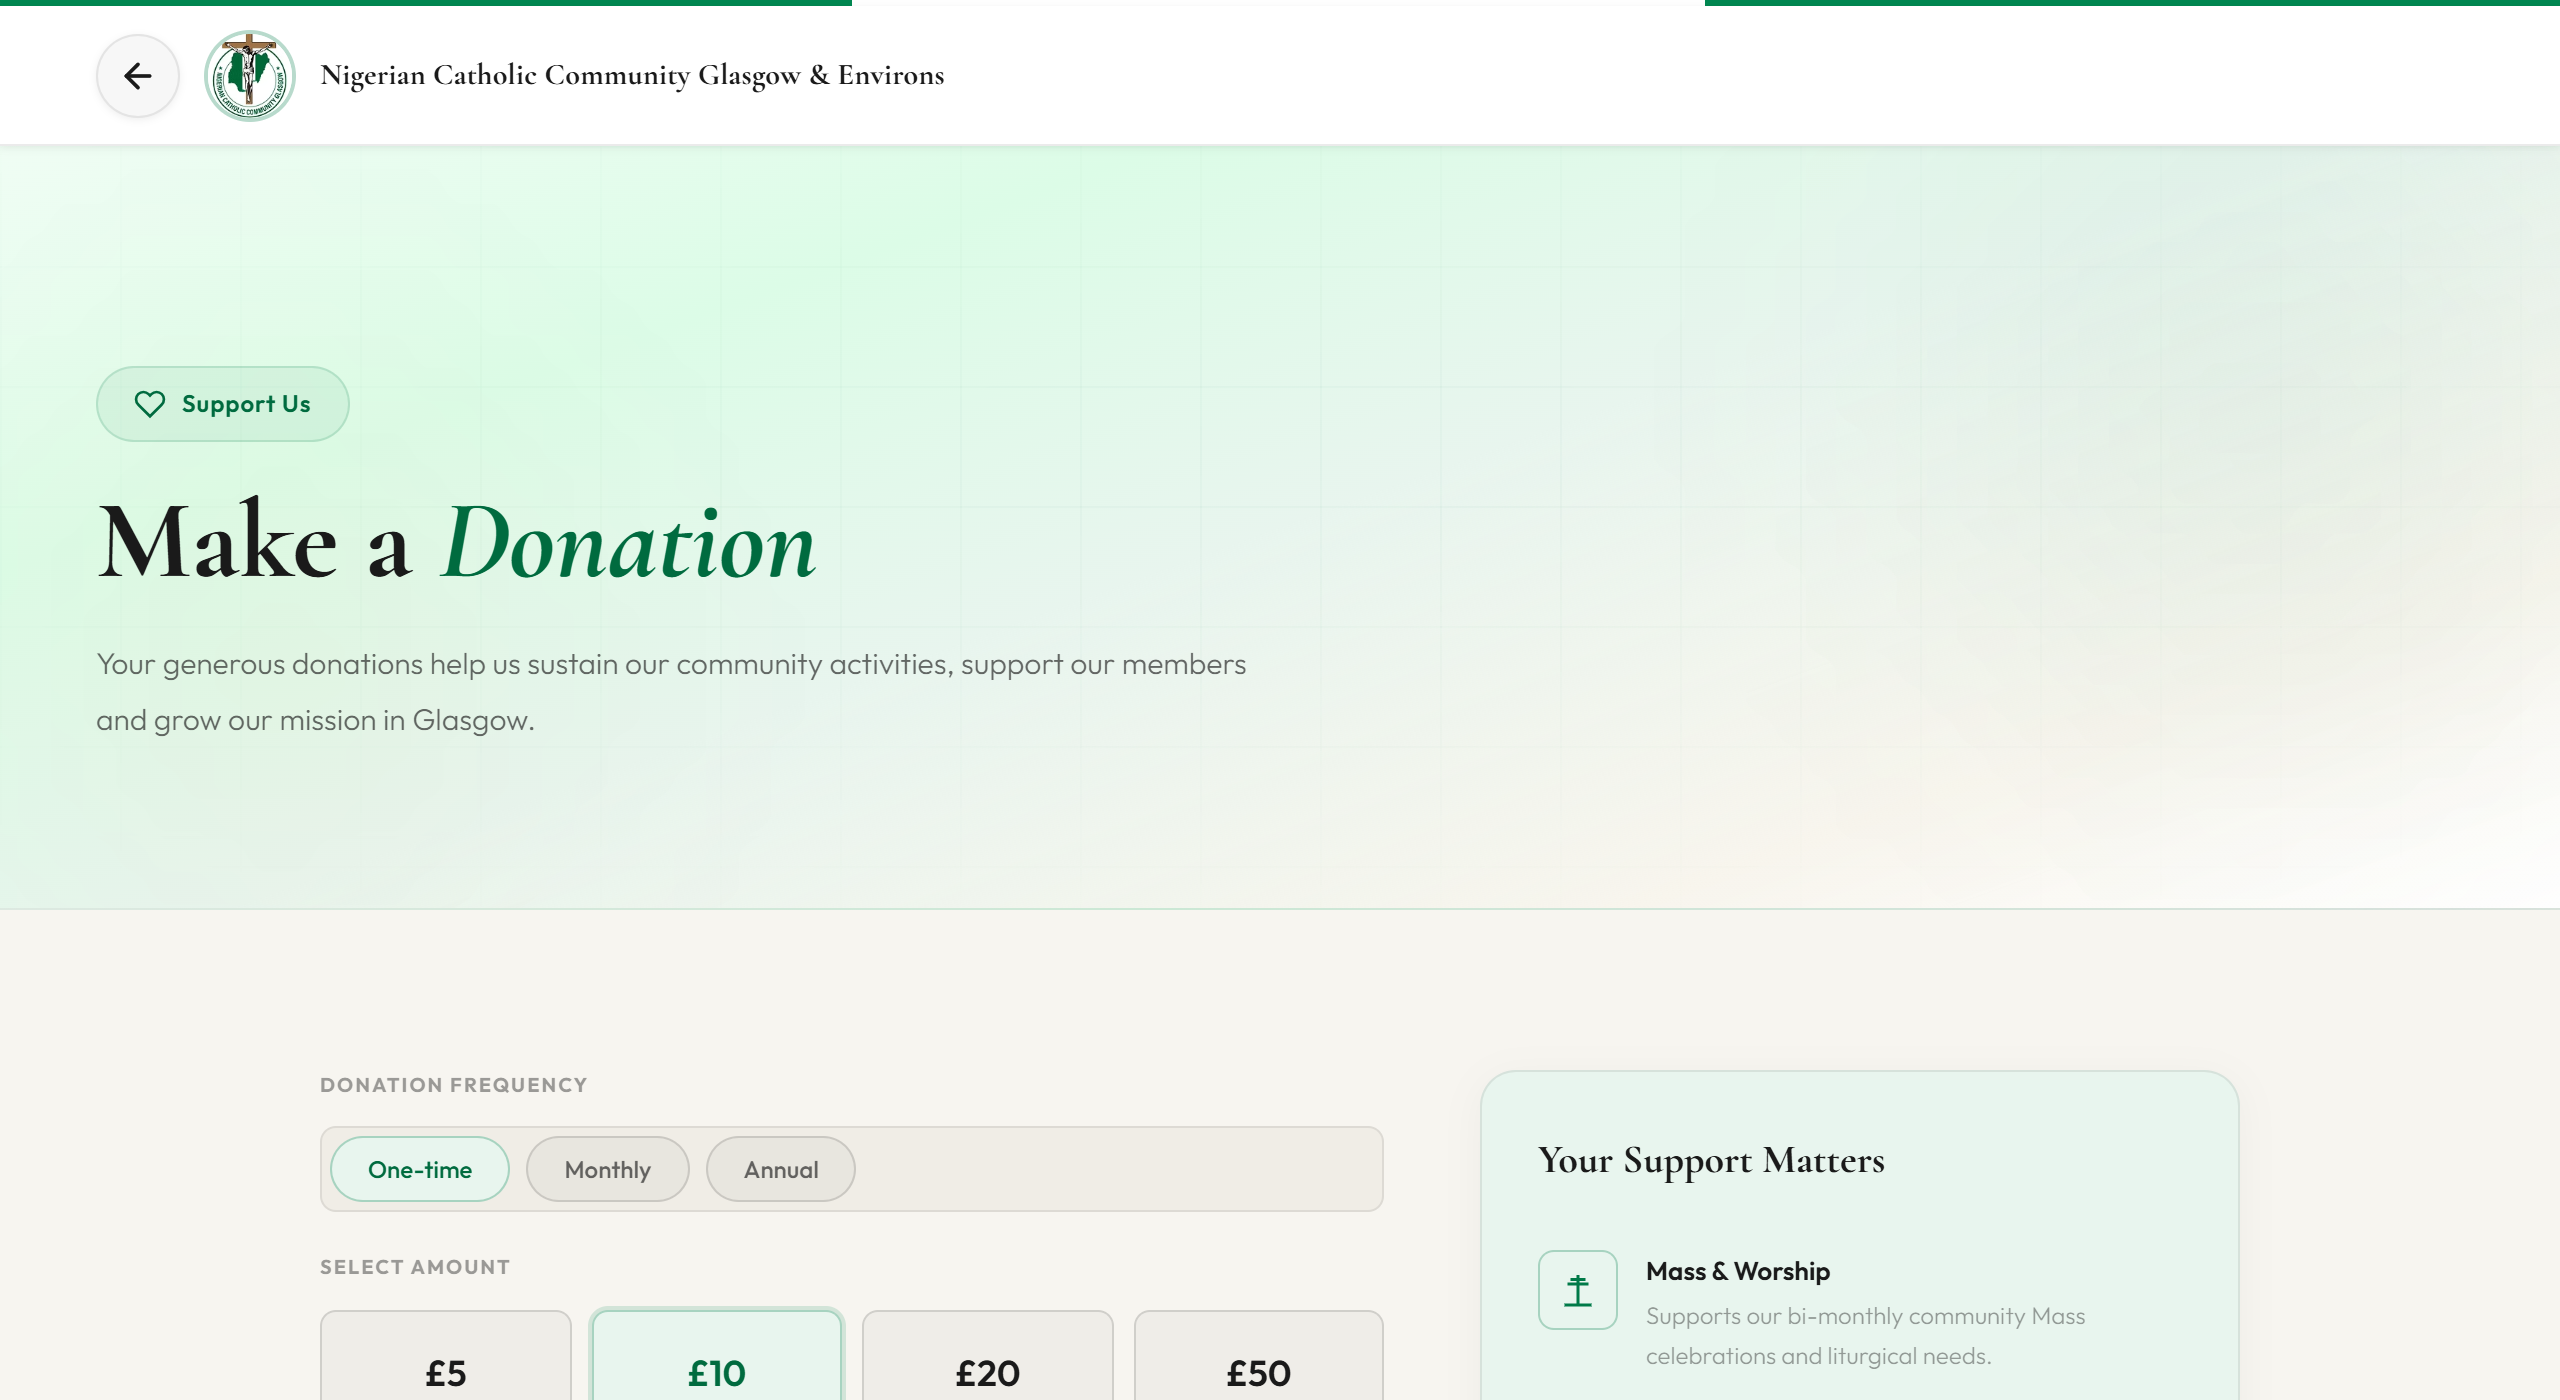
Figure 6 — Donations page (donate.html). Completely separate from QR wallets; includes Gift Aid option.
5. Customer pays at admin desk (event day)
Finance rule: For Payment received mode, do not issue a spendable QR until you have the money. For Virtual load, you may share QR first but the customer cannot spend at stalls until you click Confirm payment received.
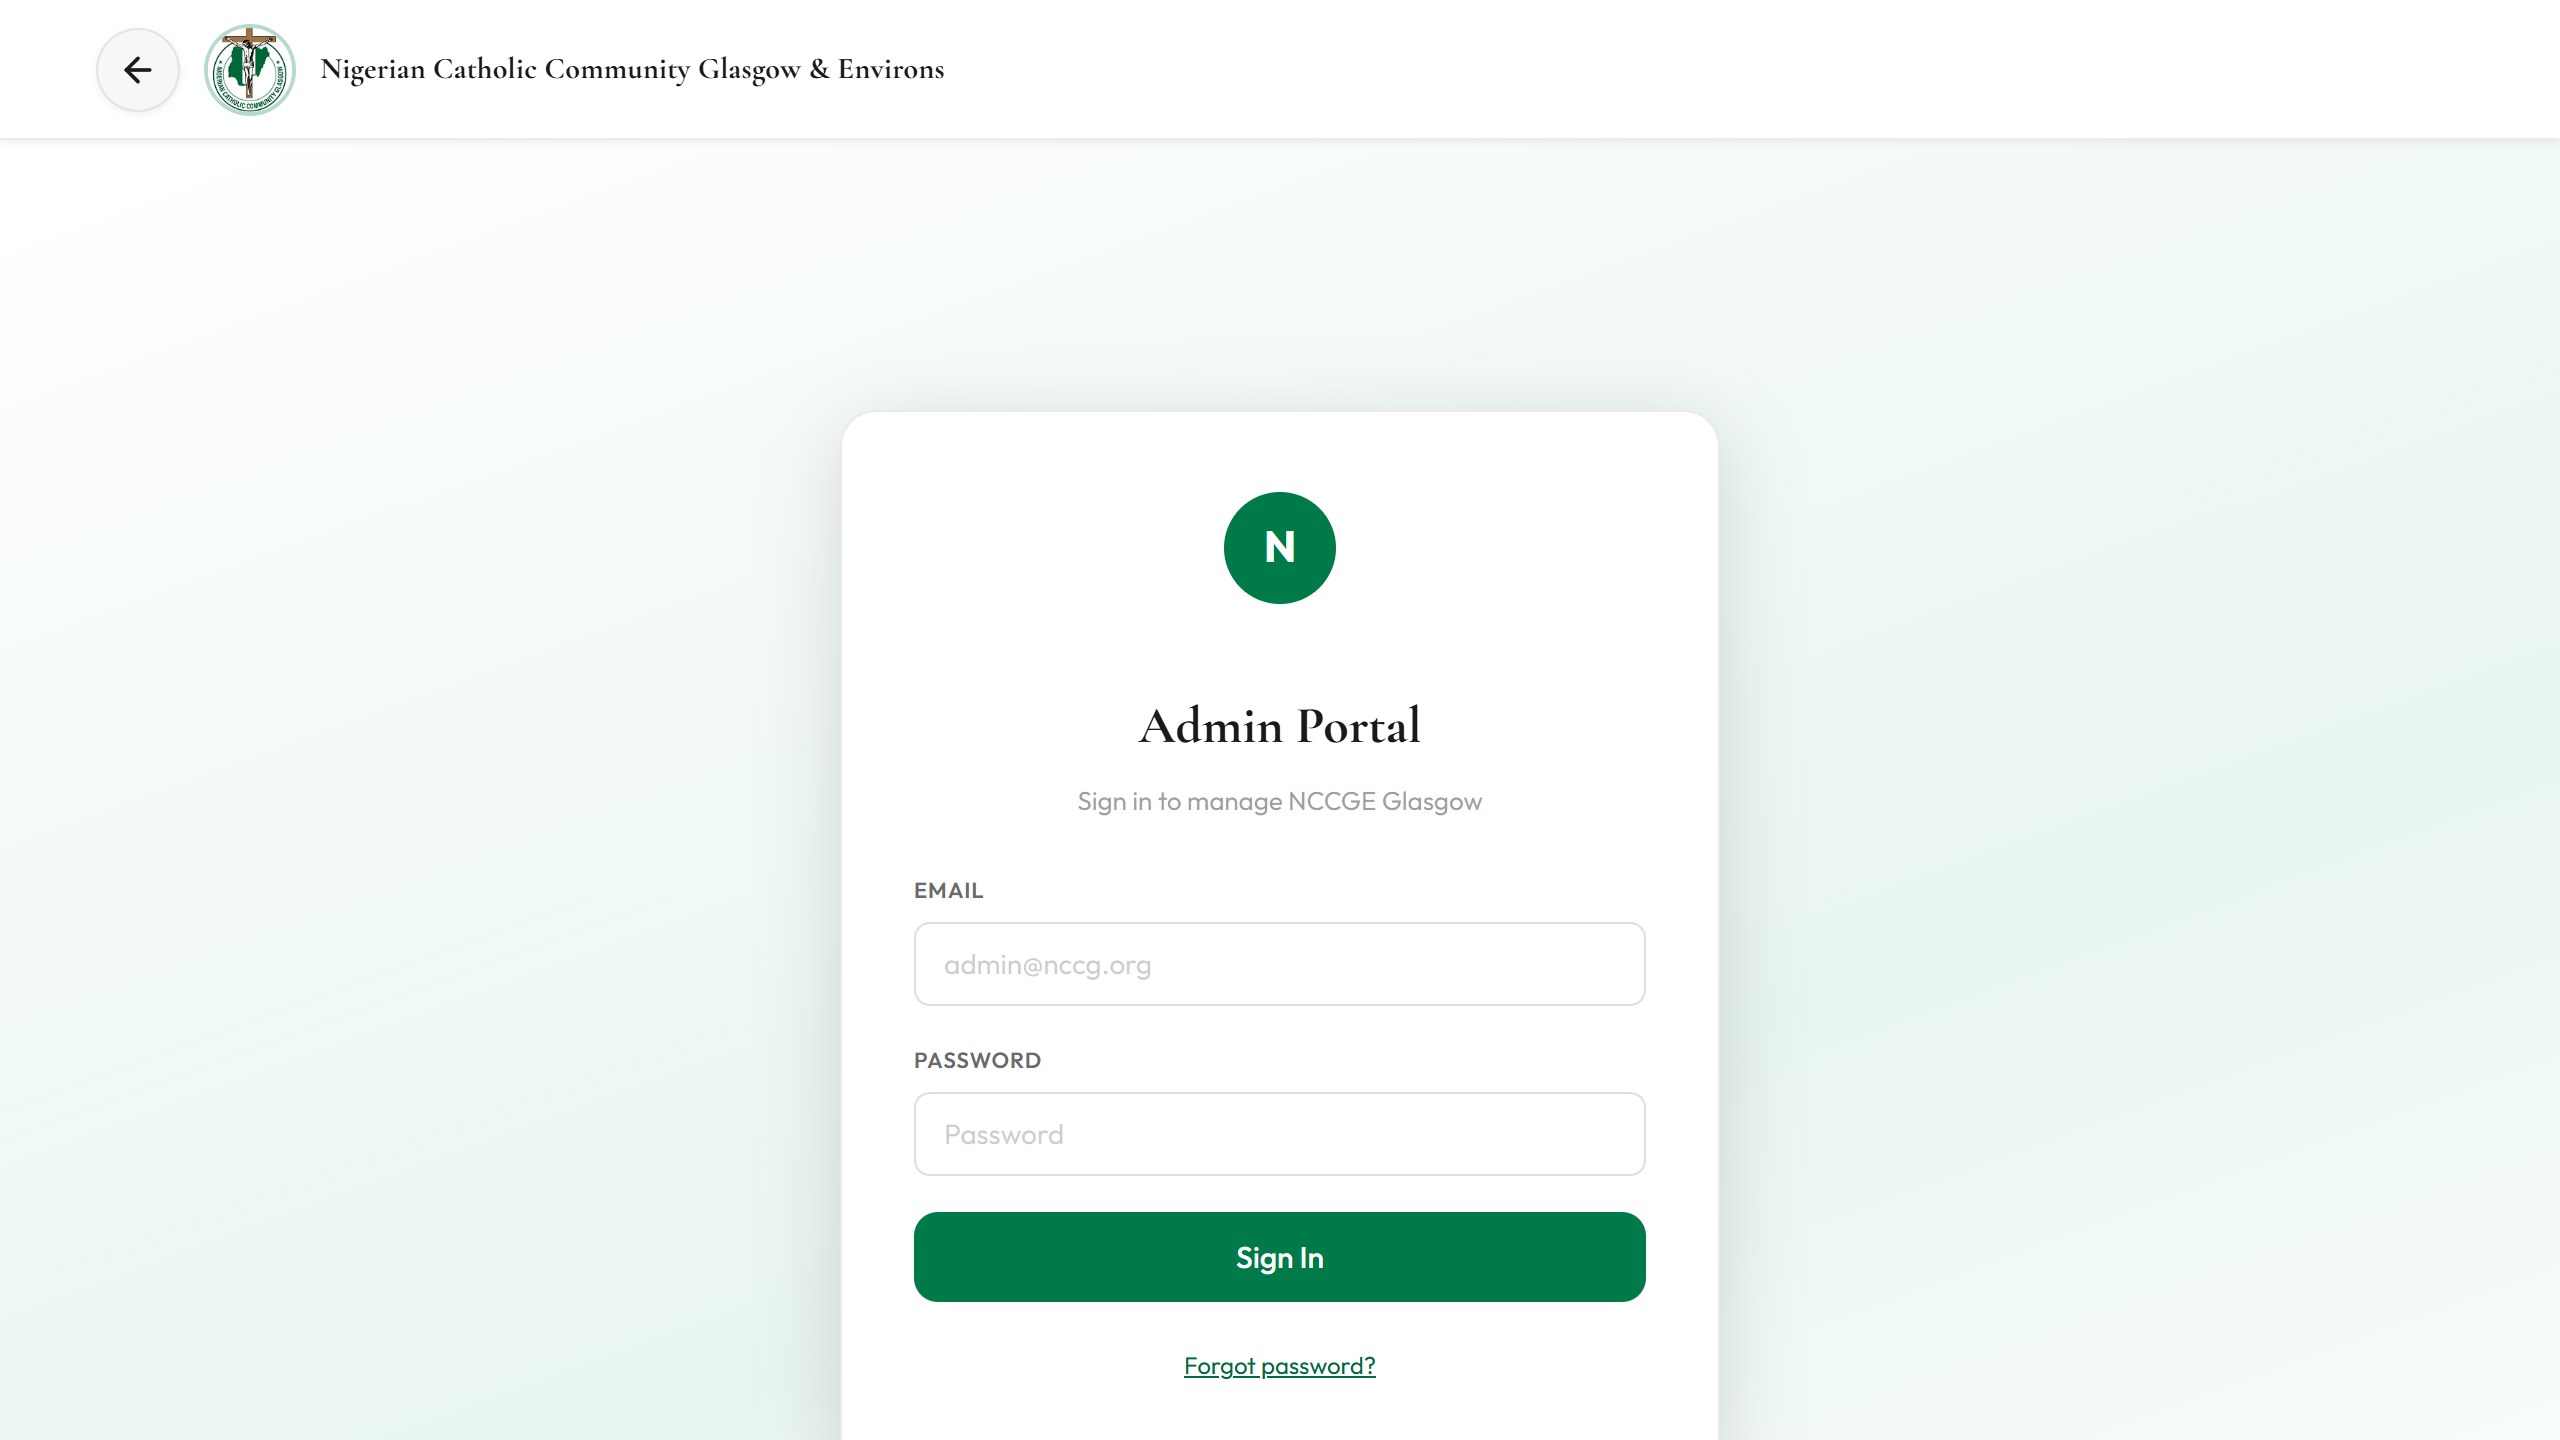
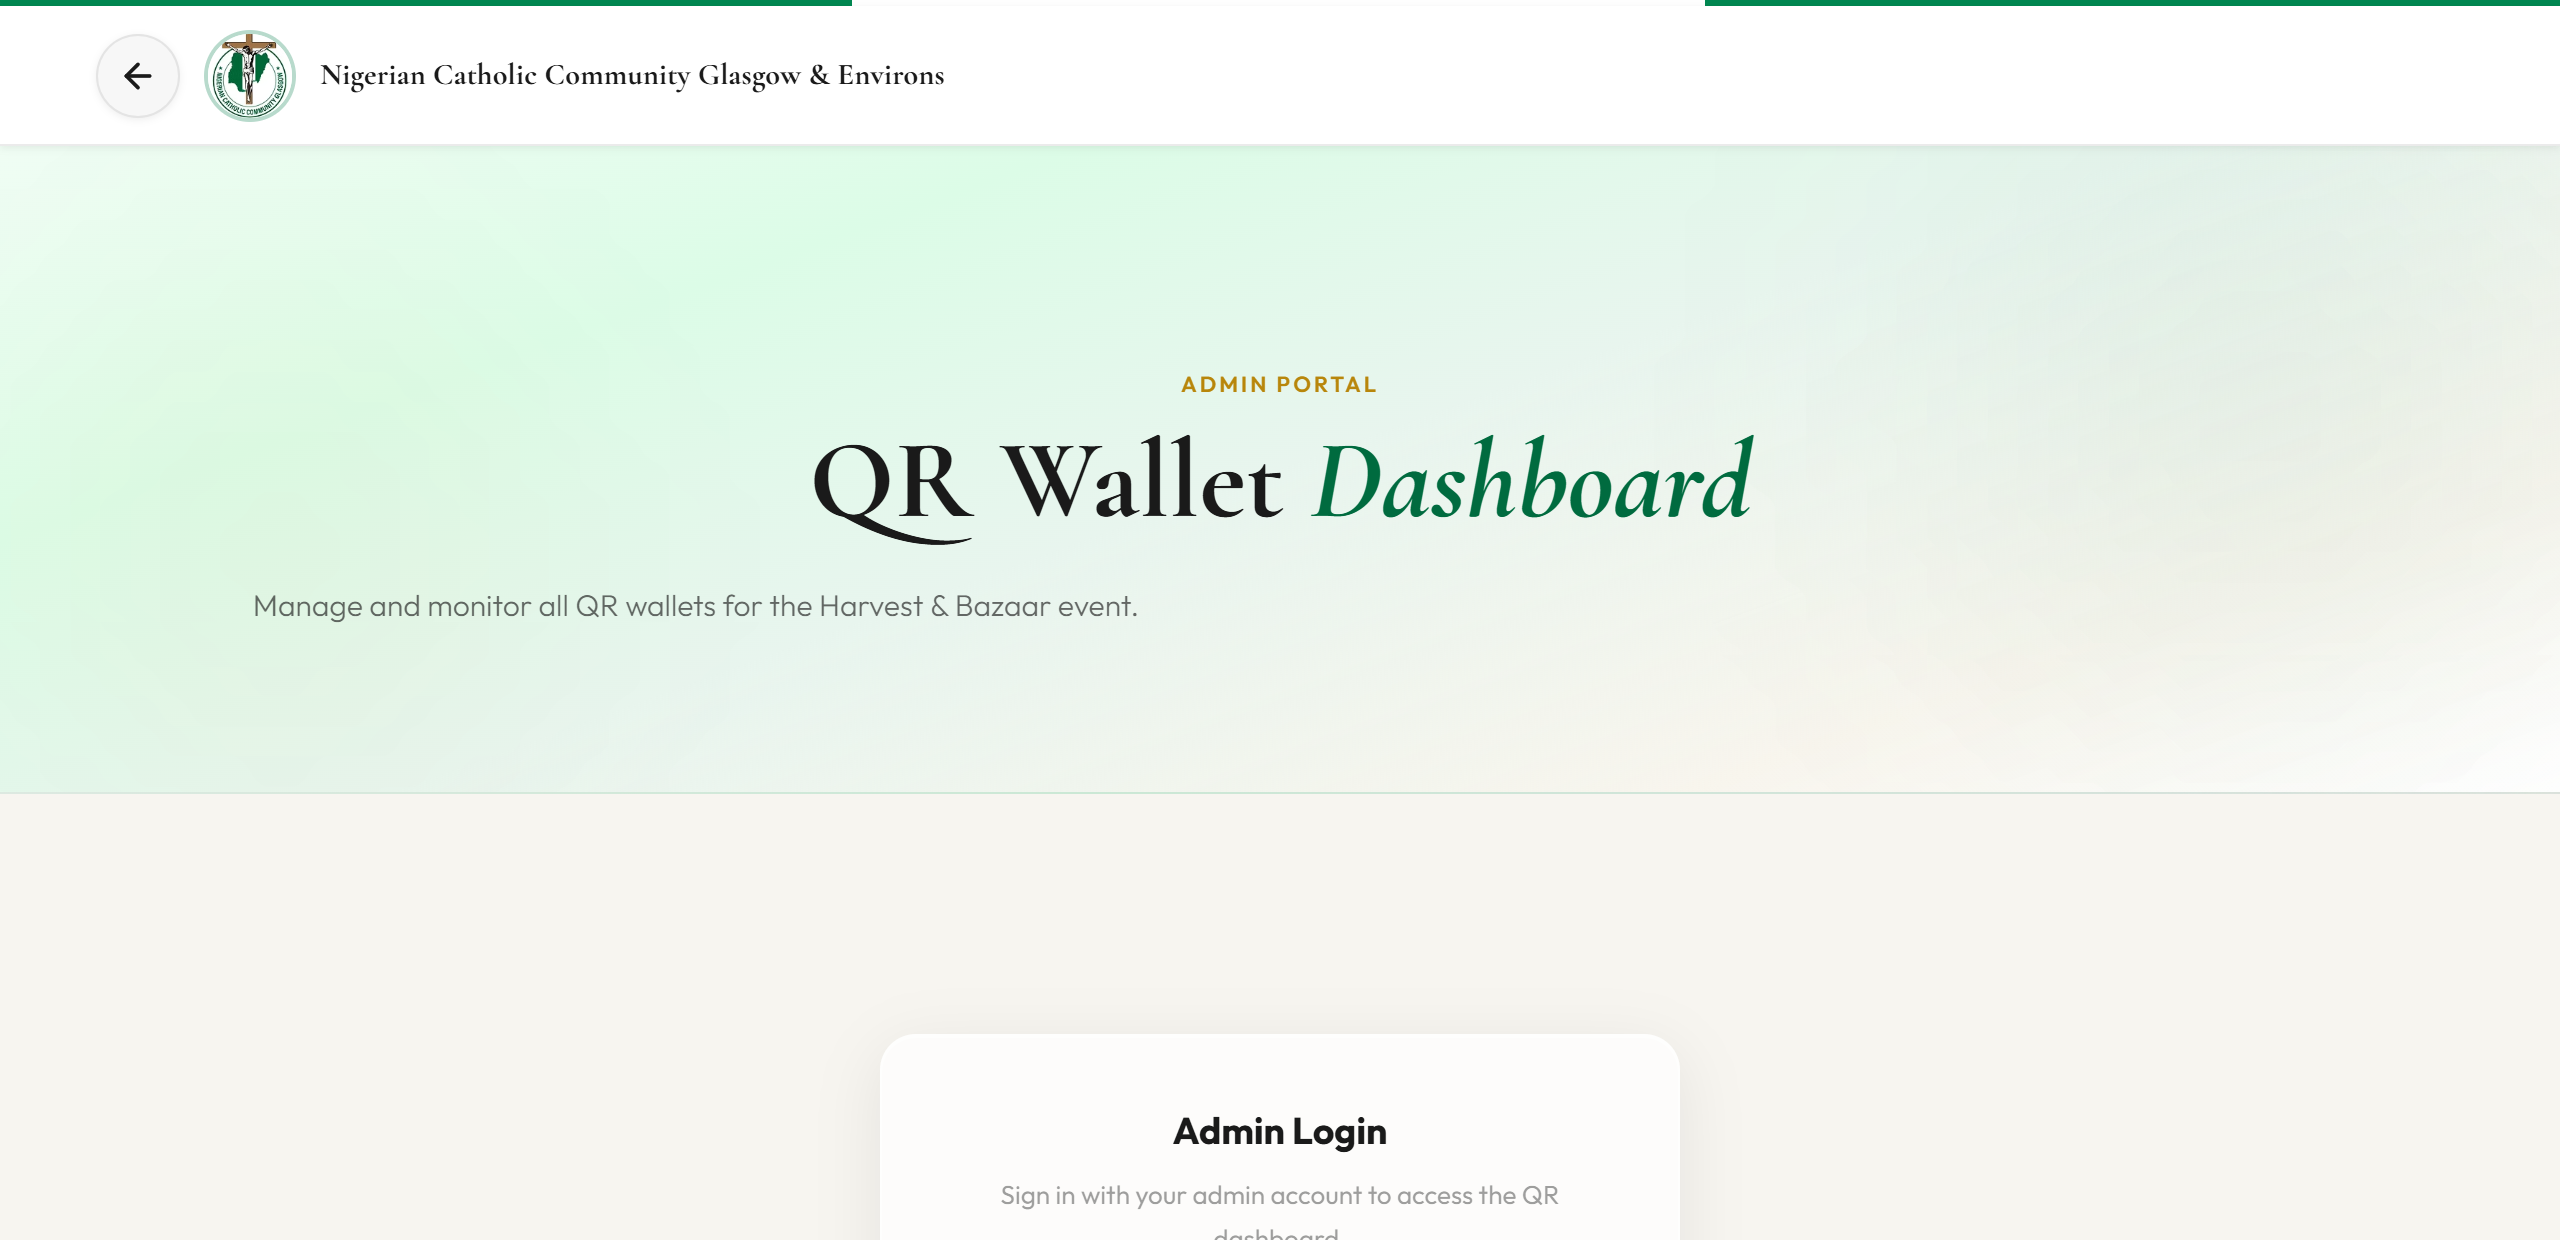
Figure 7 — Admin login (admin.html). Finance staff sign in here, then open Reconciliation in the left menu.
Step
Action
Where / button
1
Open admin portal and sign in
admin.html
2
Click Reconciliation in left menu
Sidebar
3
Click + Issue / Top Up Wallet
Manual Wallet Loading panel
4
Choose Issue type
New wallet or Top up existing
5
Choose Payment mode
Payment received or Virtual load (pending)
6
Enter Customer Name (required)
Form field
7
Enter Email / phone (recommended)
For Email / WhatsApp share buttons
8
If top-up: paste Existing voucher code
From customer’s email or voucher.html
9
If payment received: select Cash / POS / Bank Transfer
Dropdown
10
Enter Amount (£)
Min £1 (new wallet or top-up)
11
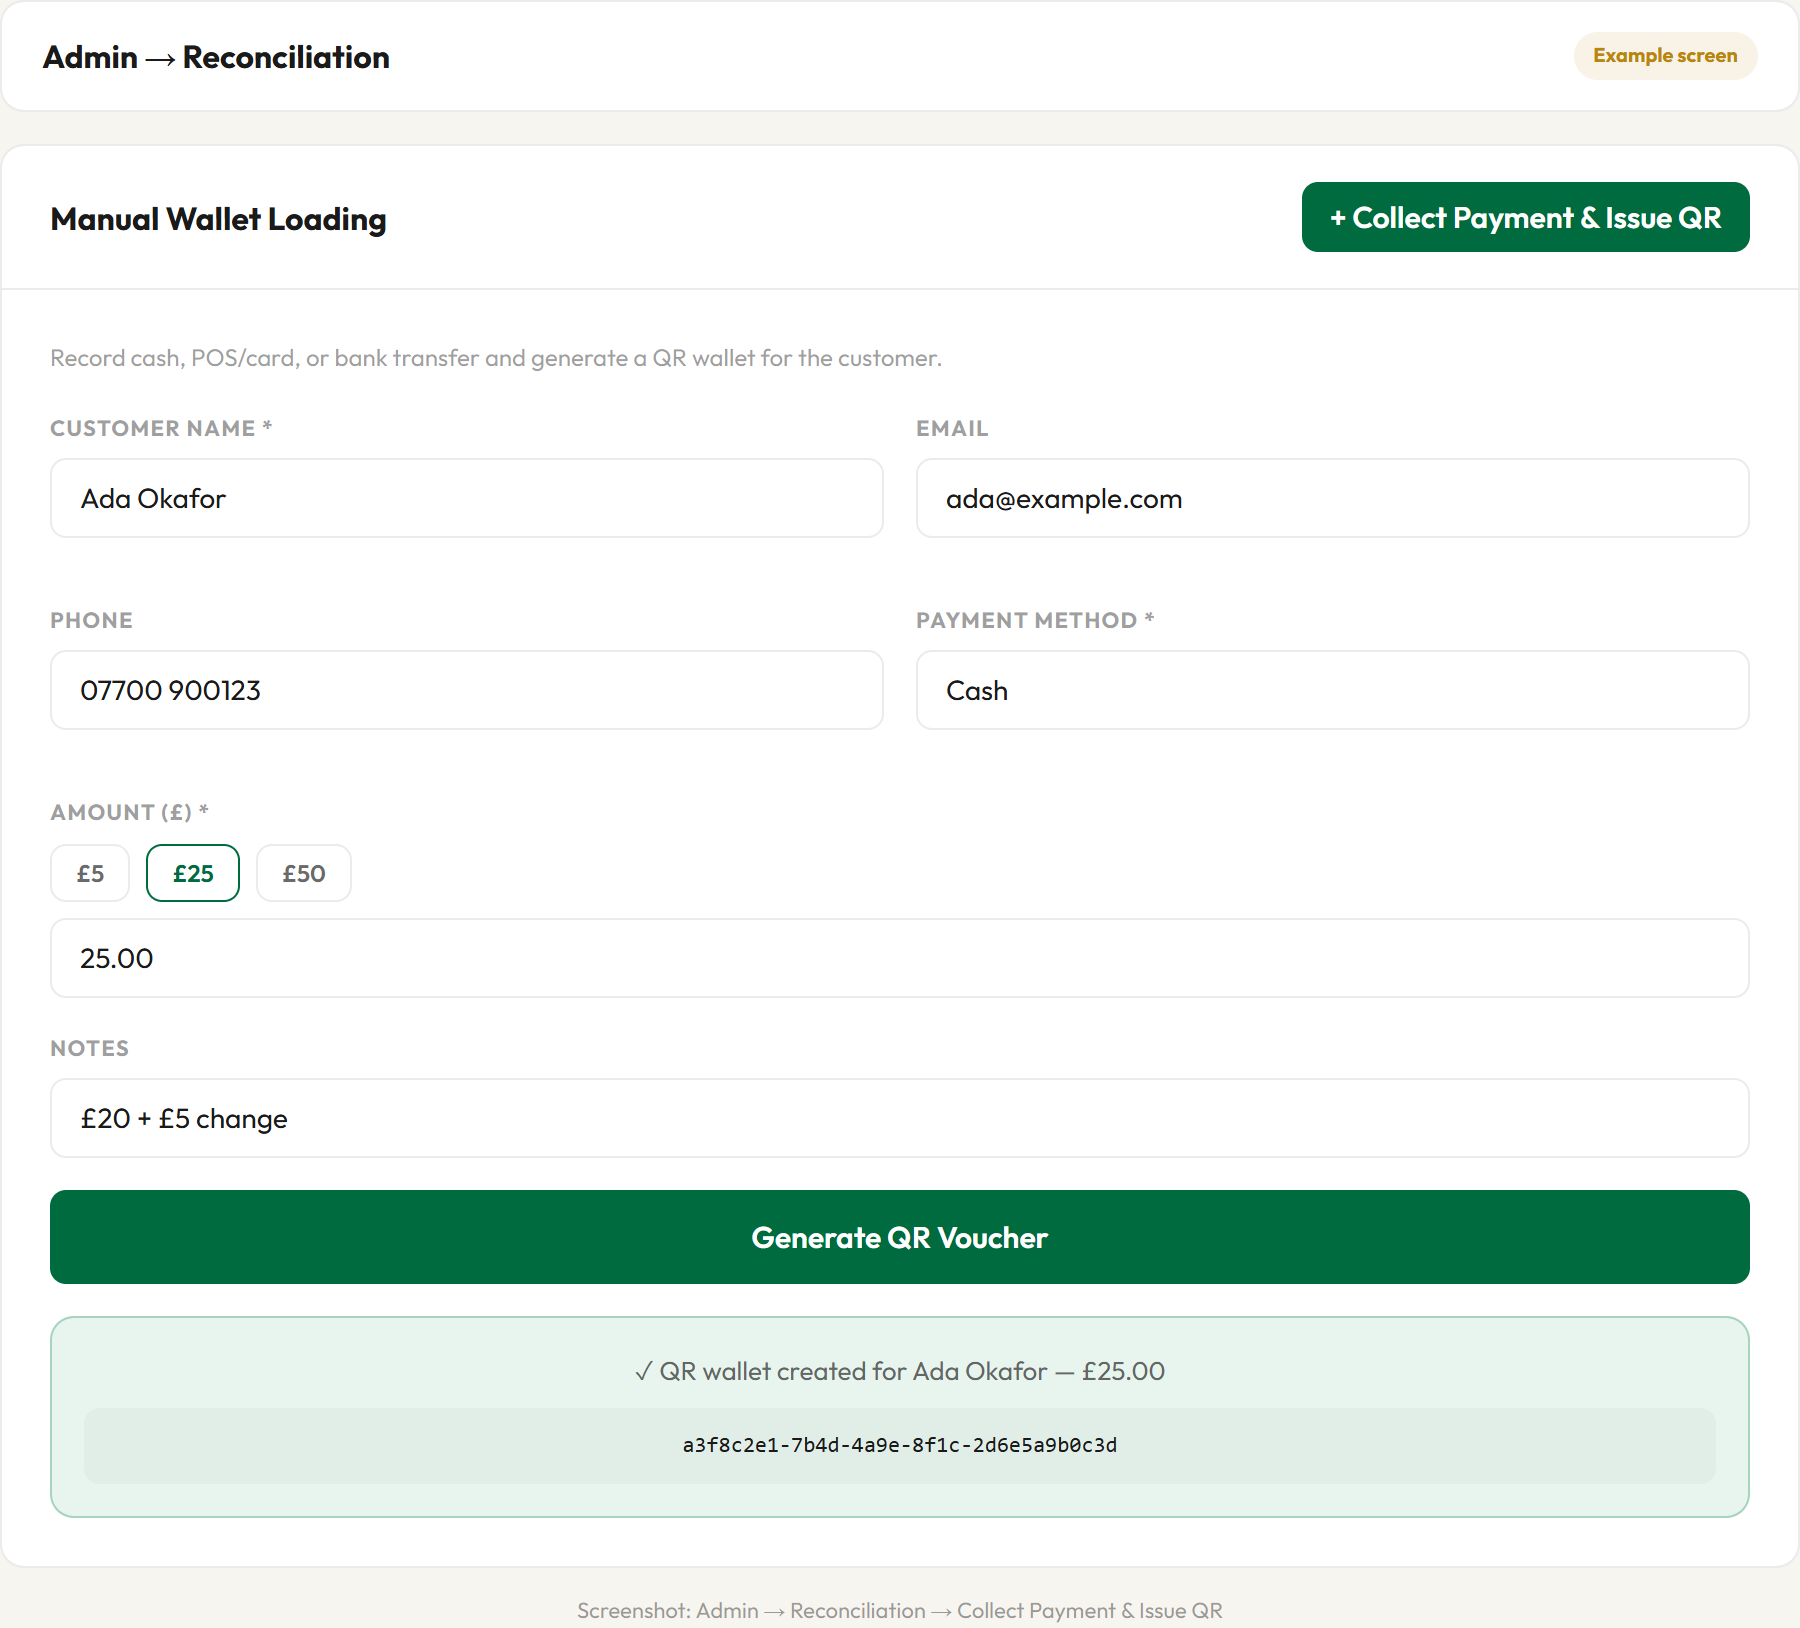
Click Generate QR Voucher or Virtual load & share QR
QR + voucher code appear
12
Share with customer: Copy, Email, or WhatsApp
Customer photographs QR
13
If virtual: when paid, click Confirm payment received
Wallet becomes spendable at stalls
Tell the customer: “Show this QR at any stall. If we issued it virtually, you can only spend after we confirm your payment.”
Figure 8 — Manual Wallet Loading. New or top-up; payment received or virtual; share QR; confirm payment when due.
5A — Helping someone who cannot use the website (virtual load)
Use Virtual load (pending) payment mode.
Enter customer name and amount → generate QR.
Tap WhatsApp or Email to send QR details (or show on screen for them to photograph).
Collect cash or verify bank transfer later.
Click Confirm payment received — only then can they buy at stalls.
Do not skip confirmation. Until you confirm, the system blocks vendor redemptions — this protects NCCGE from unpaid spending.
6. Vendor at the stall — complete Quick Sale guide
Plain English: Customer shows QR → you scan → you tap the item → give goods → Next customer. One tap charges the wallet. Print for stalls:NCCGE-Vendor-Stall-Guide.html
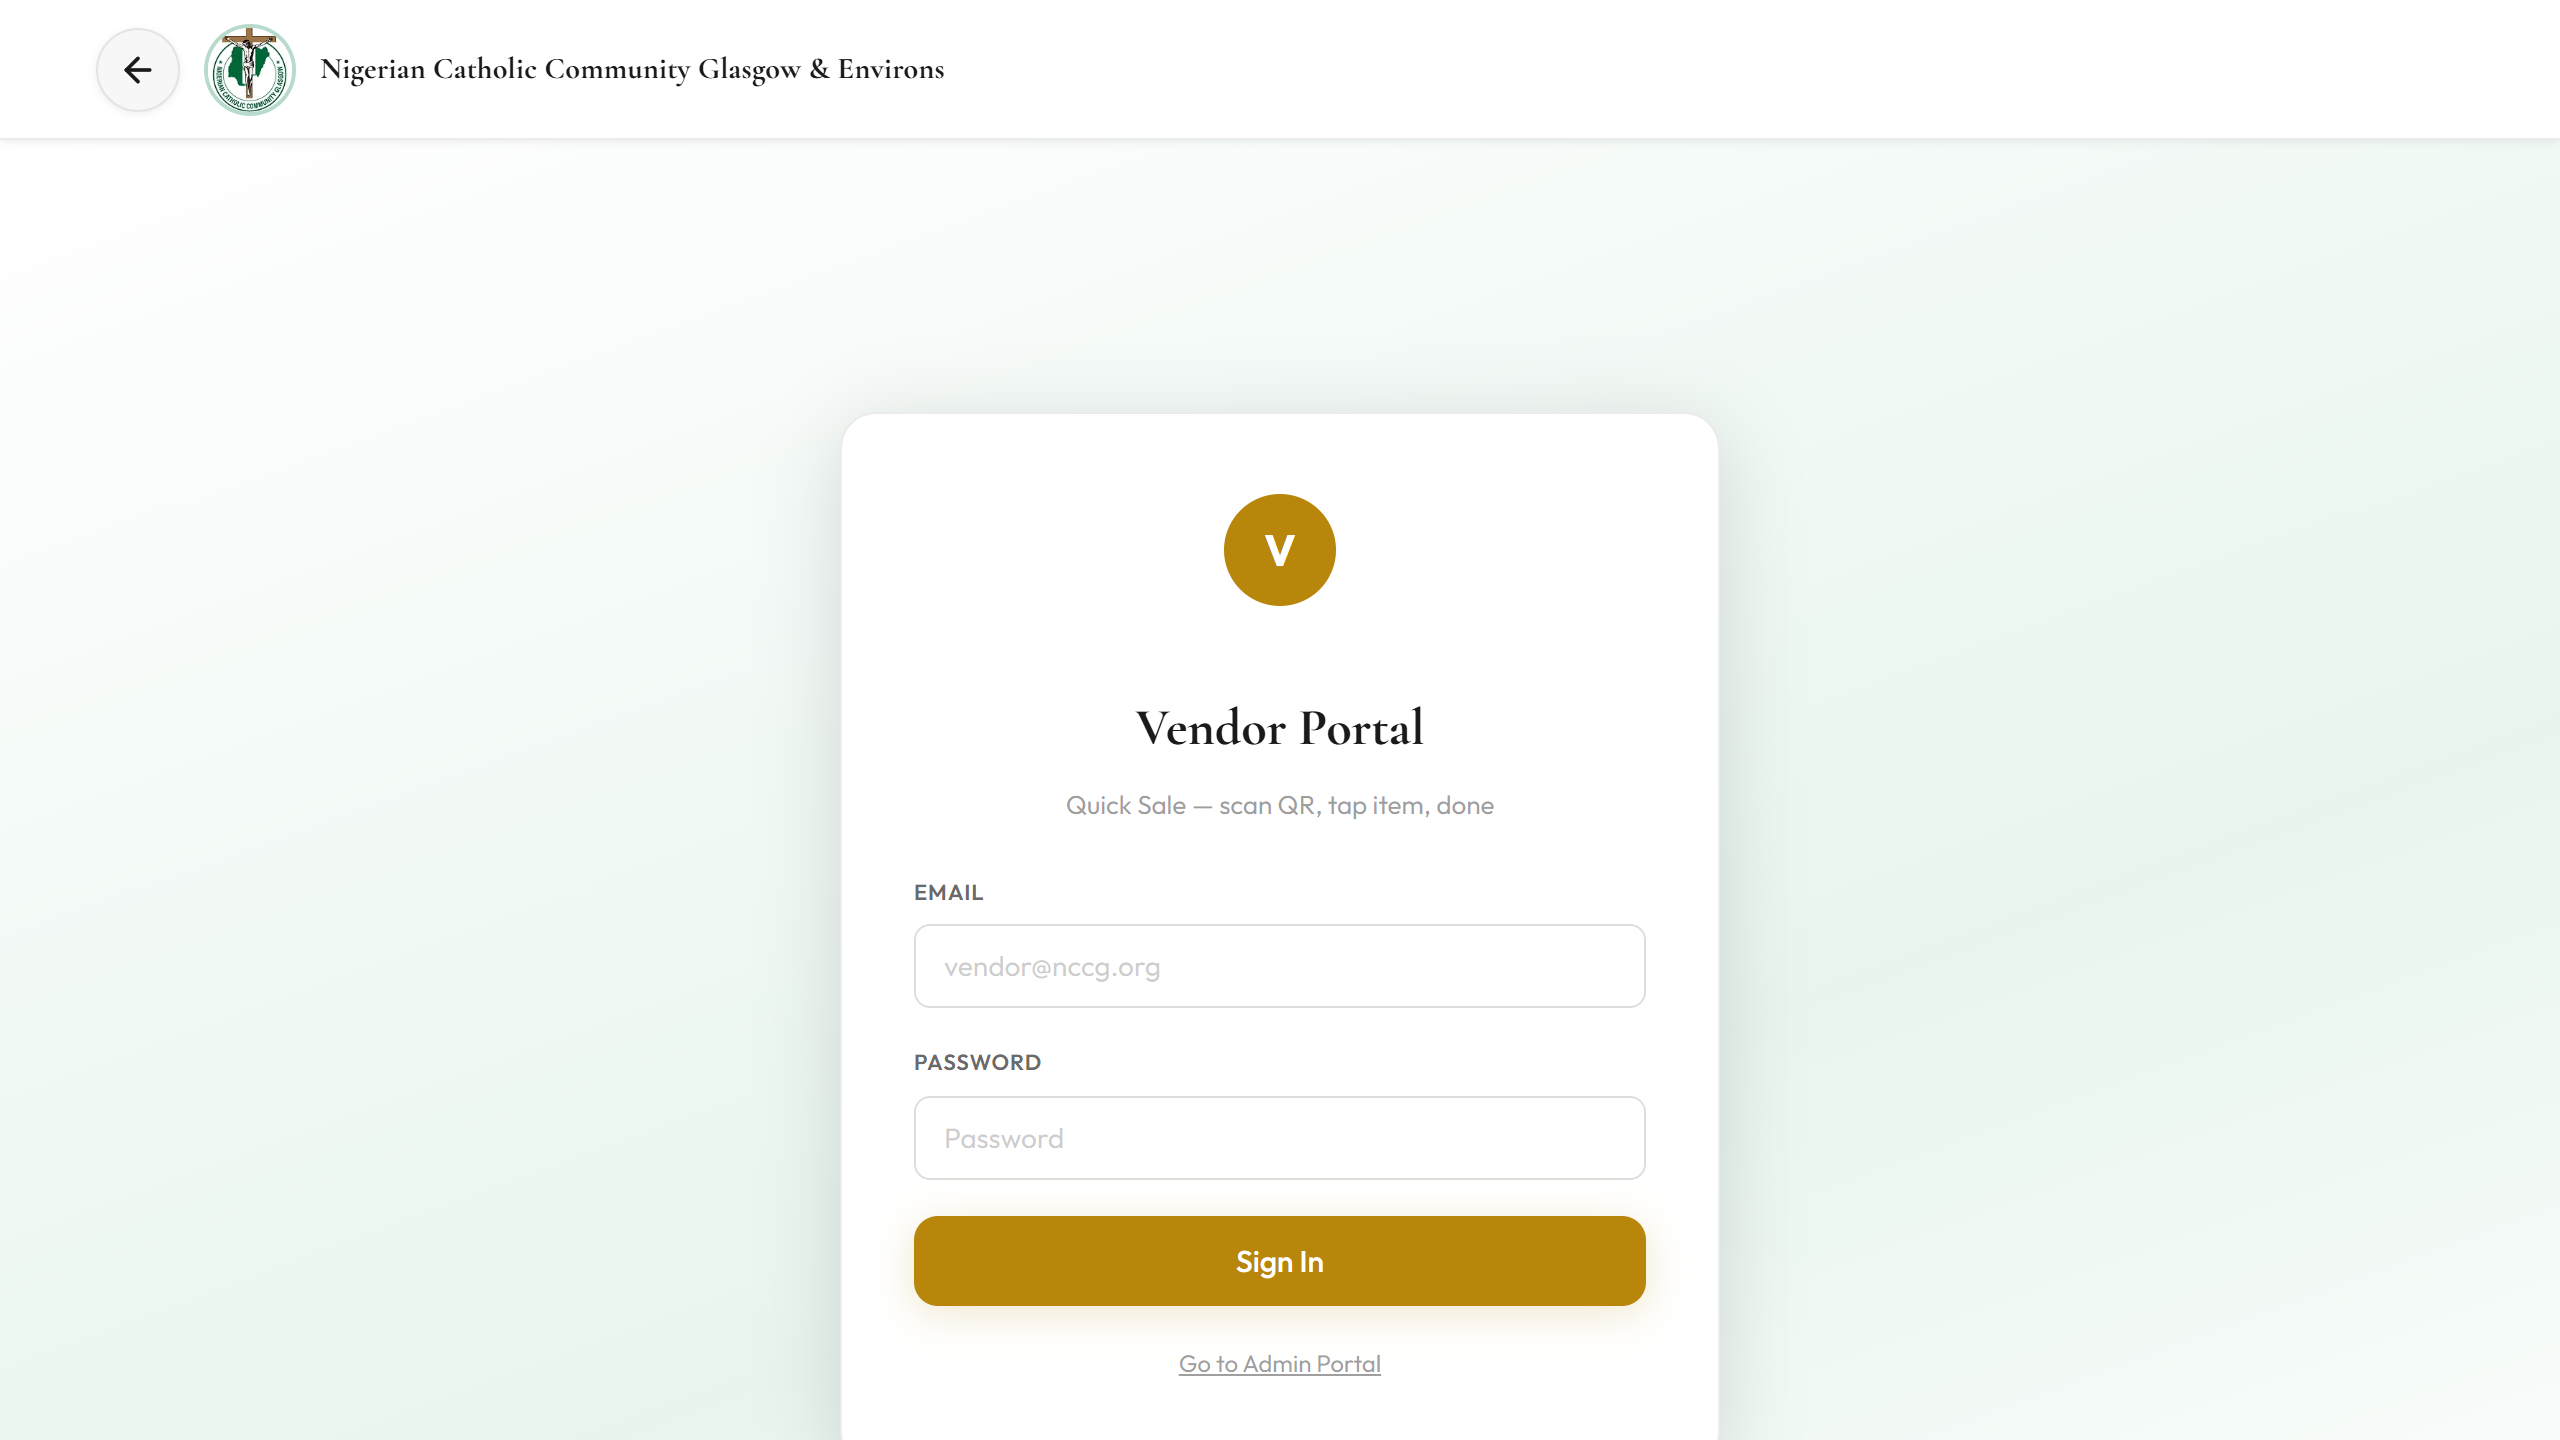
Figure 9 — Vendor login (vendor.html)
6.1 Before event day (finance setup)
Step
Who
Action
1
Super Admin
Create one vendor login per stall (Admin → Users)
2
Finance
Run practice sale (Section 12) with £1 test
3
Each vendor
Set My stall sells; allow camera; bookmark vendor.html
Items the customer already paid for online — tap tile to hand over at £0
E
Item tiles
Tap = charge (grey = insufficient balance; green Pre-paid badge = free handover)
F
Next customer
Clears for next person
G
Advanced
Verify-only, manual redeem, catalogue dropdown
6.4 One complete sale
#
Vendor
Customer
Screen
1
Set stall category (once)
—
Your item tiles
2
“Show me your QR”
Opens voucher on phone
—
3
Point camera at QR
Holds phone steady
Name + balance
4
Tap item tile
—
“✓ redeemed”
5
Give goods → Next customer
Takes goods
Ready for next scan
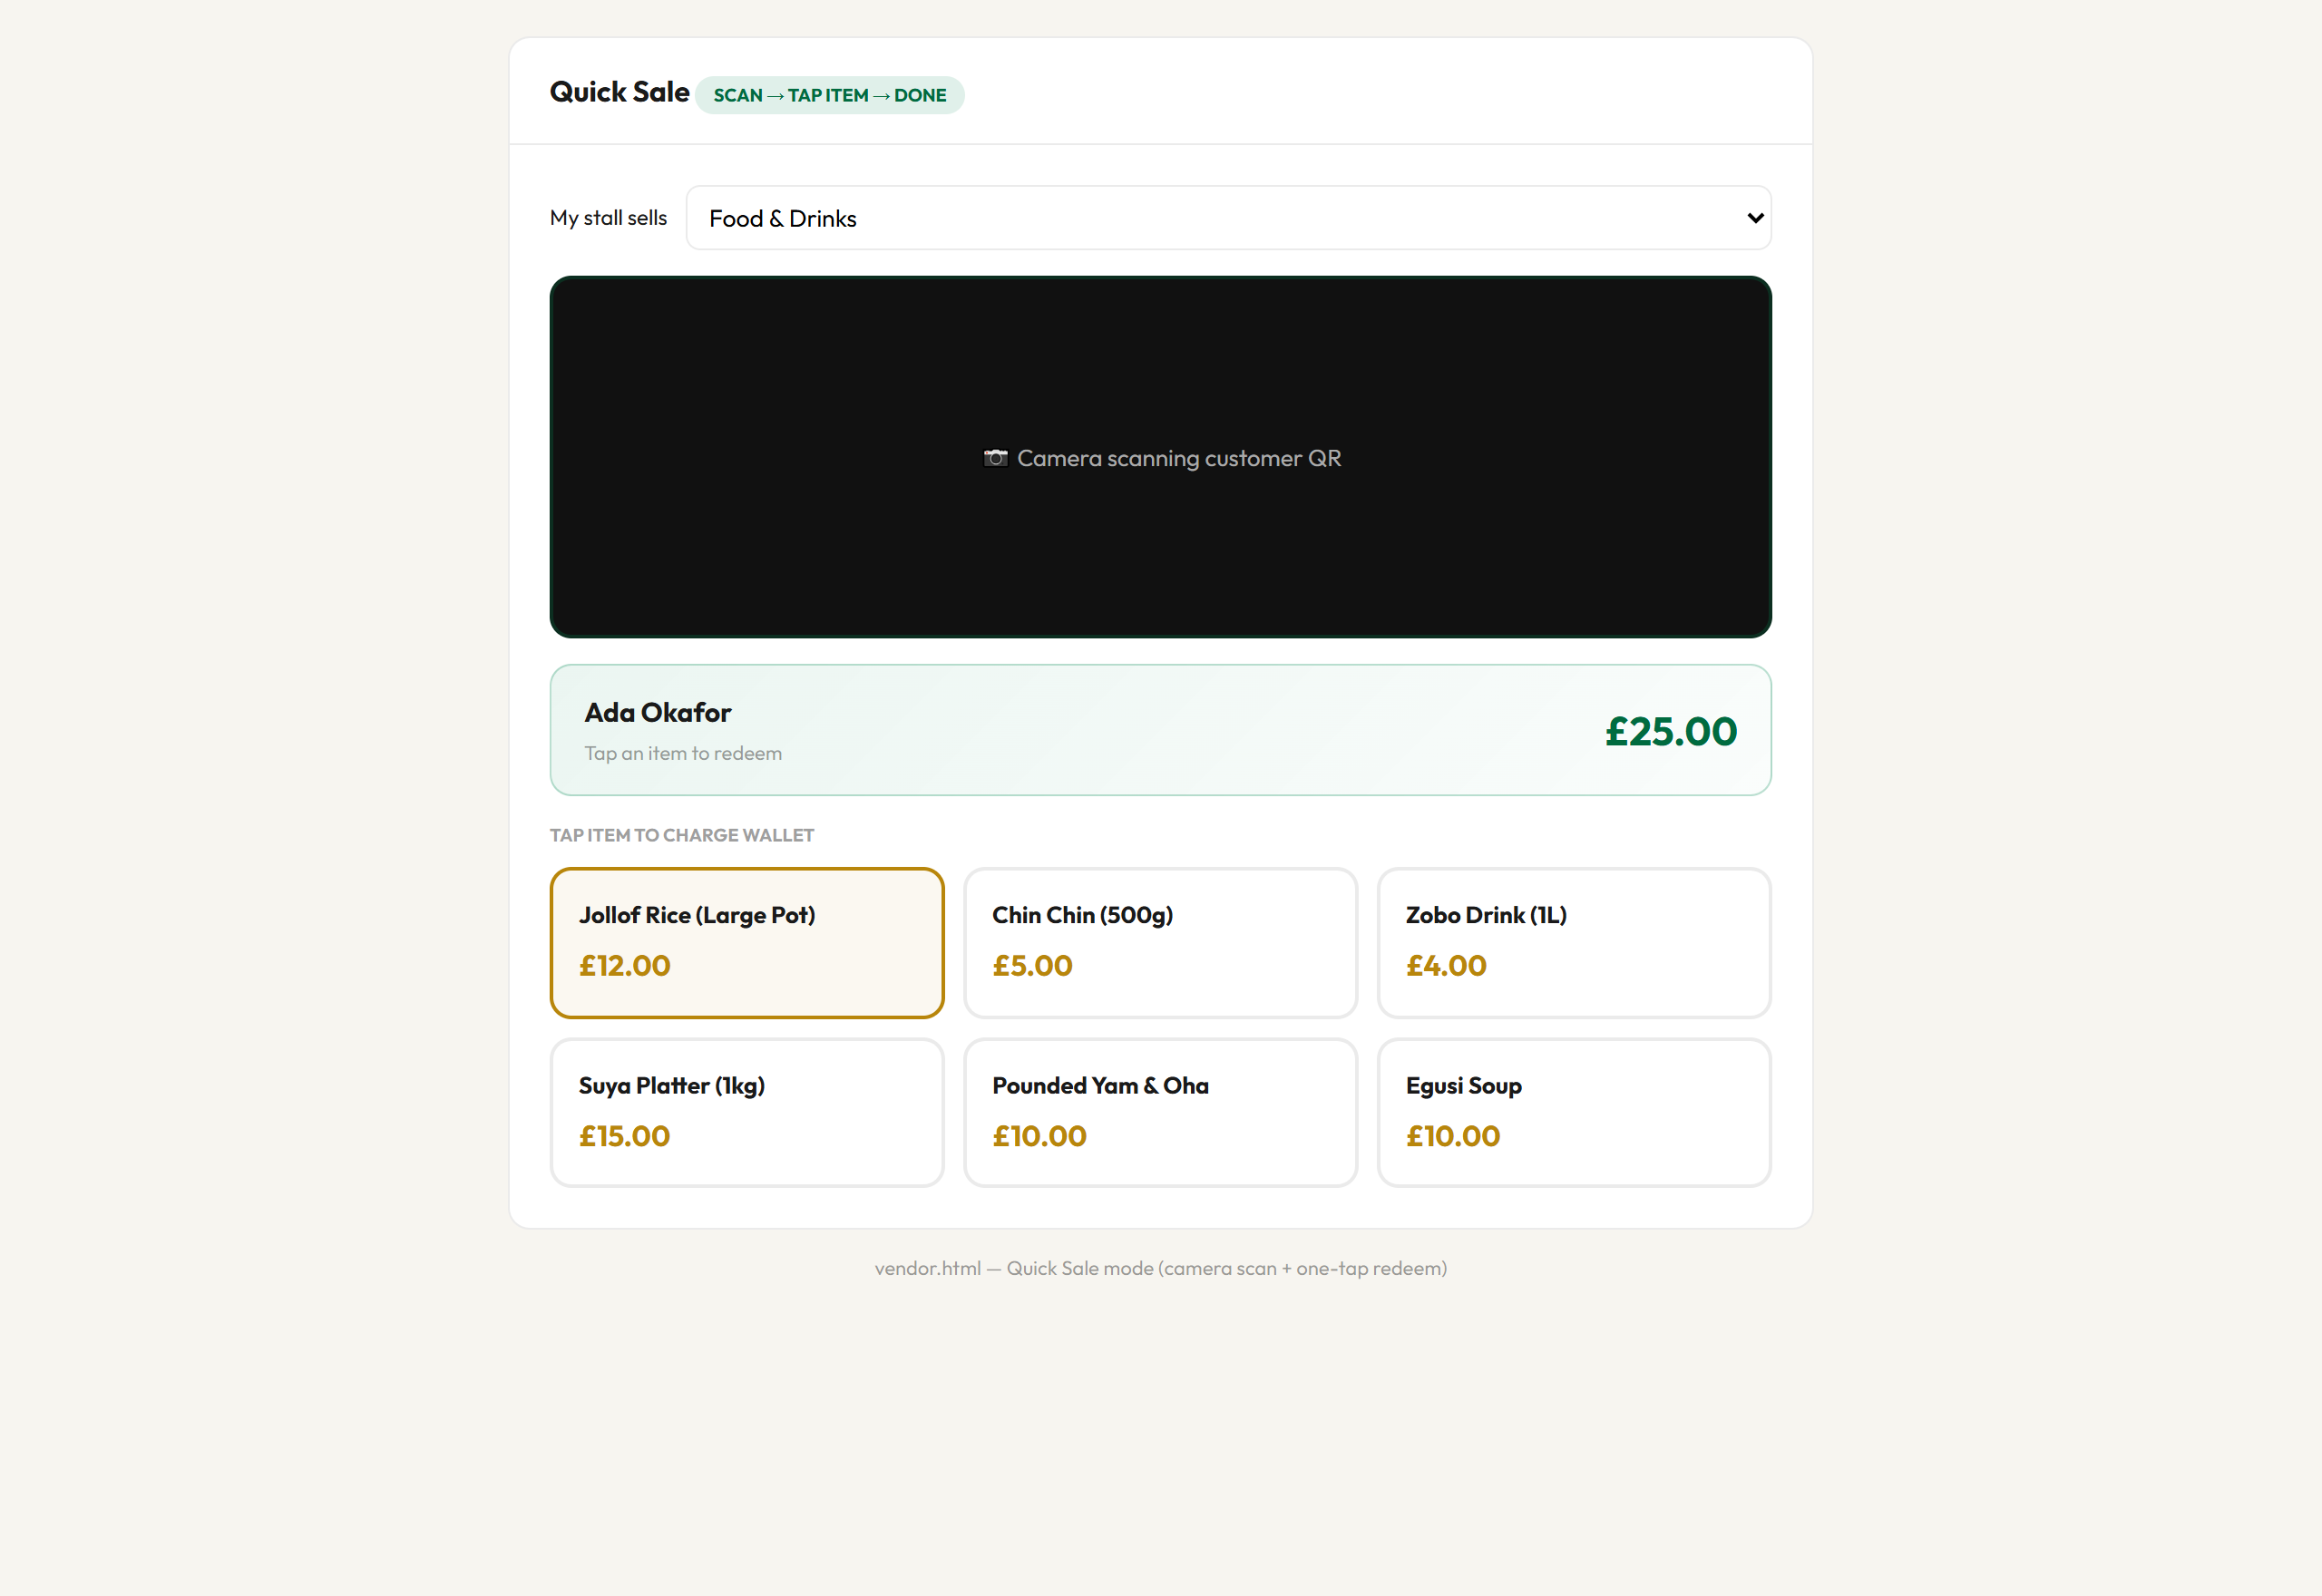
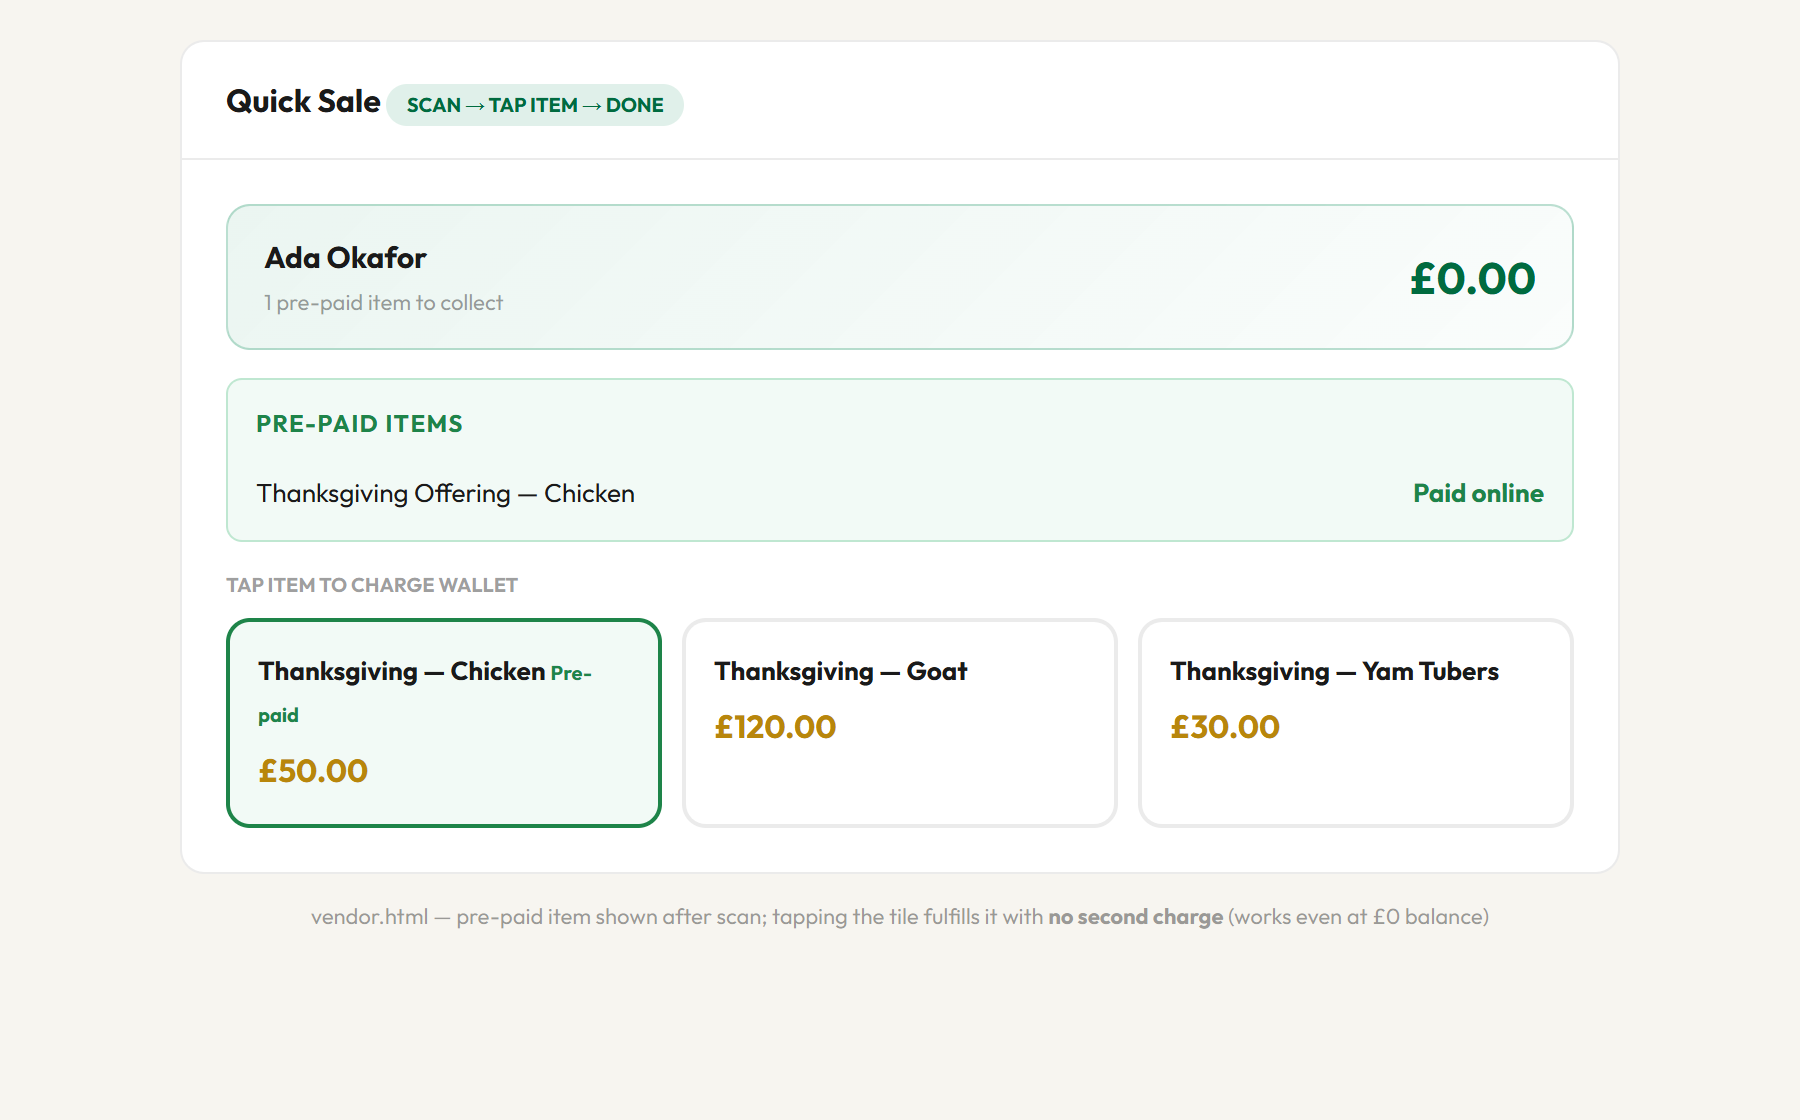
Figure 10 — Quick Sale after scan.Figure 10a — Pre-paid fulfillment. Wallet balance can read £0.00 — the green list shows what the customer already paid for online. Tap the tile to fulfill with no charge.
6.5 Examples
Walk-up sale: Ada has £25. Buys Jollof £12. Vendor scans → taps Jollof → balance £13 → Next customer. She can spend £13 at any stall.
Pre-paid collection: Chidi paid for his £50 Thanksgiving offering from his wallet online last week — balance now £0. At the desk, staff scan his QR: the green Pre-paid items list shows the offering. They tap the tile → “✓ pre-paid (fulfilled)” → hand over the offering. Nothing more is charged.
6.6 Camera not working
Enter code manually → paste voucher code → Look up → tap item
6.7 Messages
Message
Action
Insufficient balance
Smaller item or admin desk — no cash
✓ Item — pre-paid (fulfilled)
Give goods — customer paid online; no deduction
Invalid wallet
Send to admin desk (a wallet with pre-paid items still scans, even at £0)
Scan customer QR first
Scan before tapping item
6.8 Stall rules
Scan → tap item → give goods → Next customer. NO CASH for QR items.
Do
Scan then tap correct item
Next customer between people
Sign out when leaving
Do not
Take cash for QR items
Share login
Tap before scanning
7. Finance: Admin portal
7.1 Log in and find your menu
Go to admin.html → sign in.
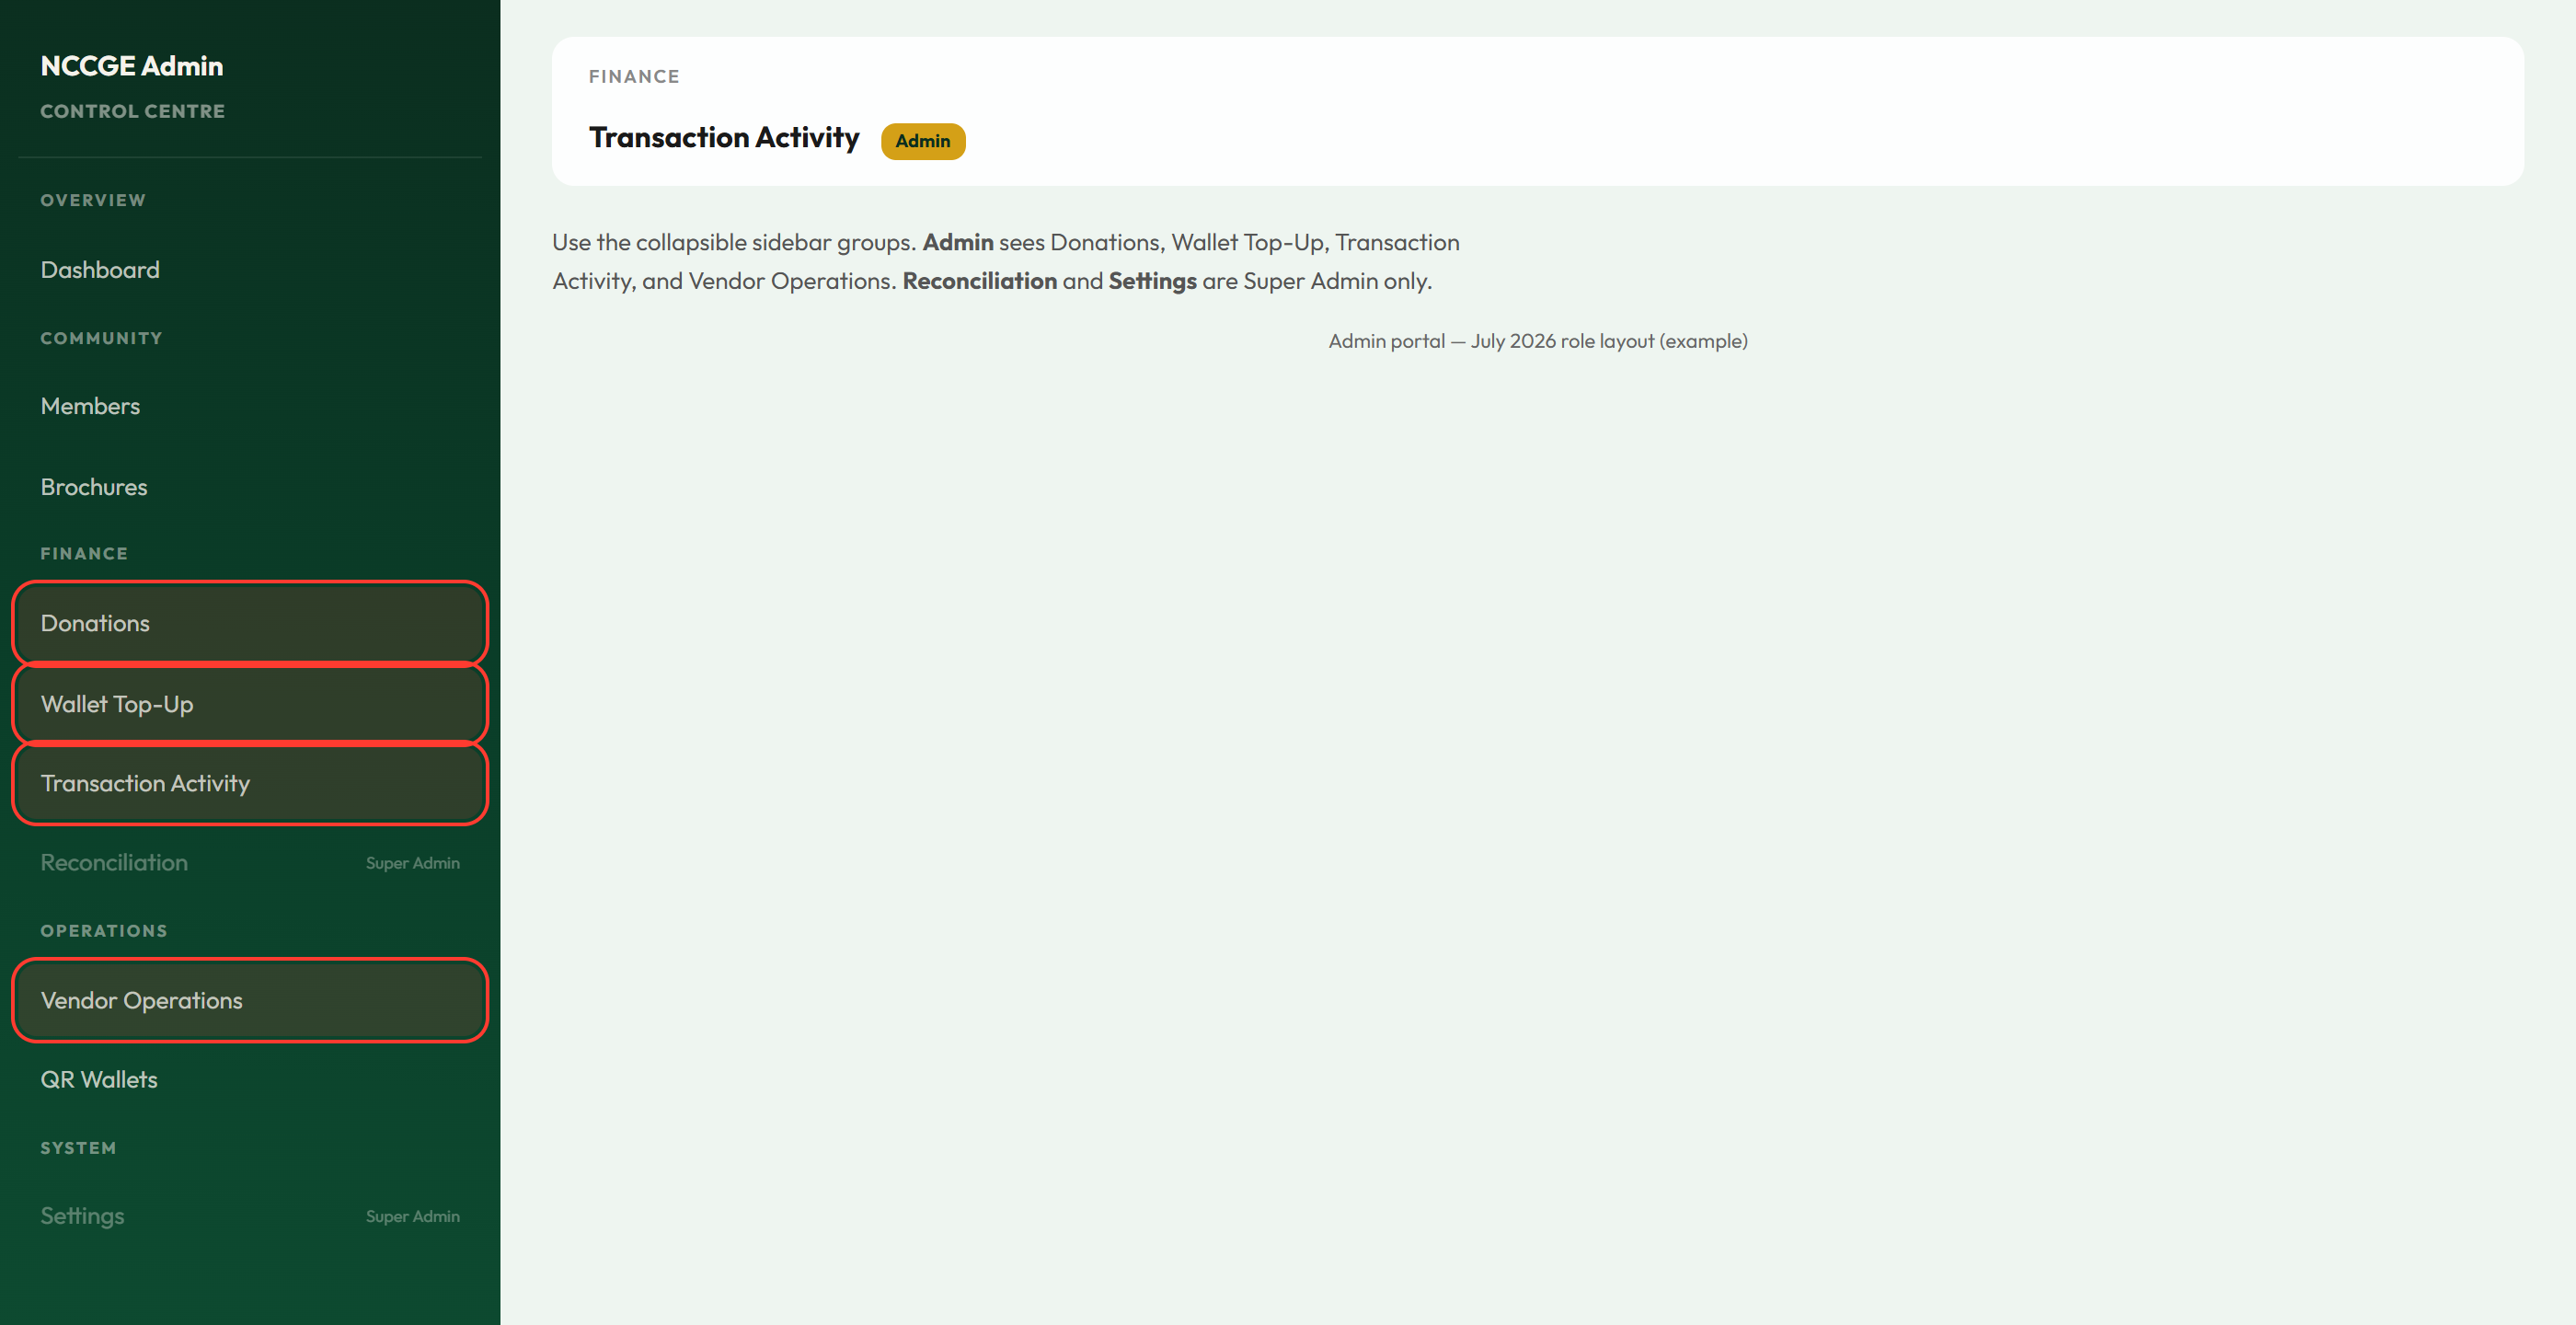
The left sidebar has collapsible groups (Overview, Community, Finance, Operations, System). Click a group name to expand or collapse it.
You only see tabs your role is allowed to use.
Figure 11a — Admin sidebar (July 2026). Admin sees Donations, Wallet Top-Up, Transaction Activity, and Vendor Operations under Finance/Operations. Reconciliation and Settings are Super Admin only.
7.2 Wallet Top-Up (cash desk)
Figure 11b — Wallet Top-Up. Finance → Wallet Top-Up. Record payment before generating a QR. Admin and Super Admin can use this tab.
7.3 Transaction Activity (Admin + Super Admin)
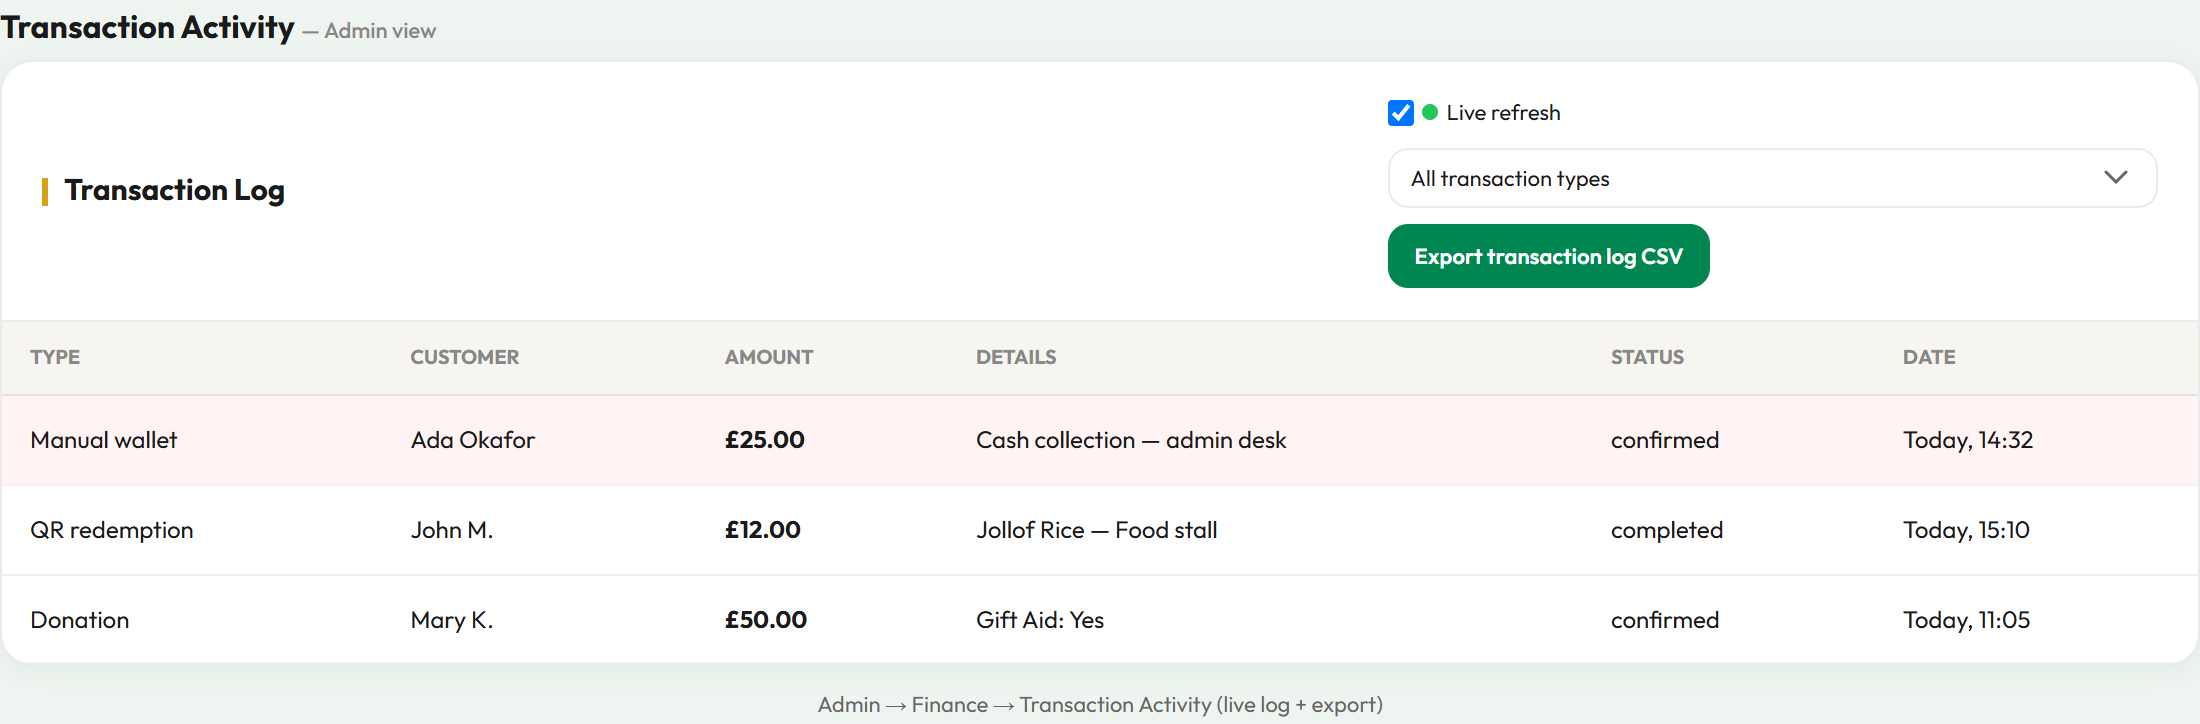
Figure 11c — Transaction Activity. Live transaction log with filters and CSV export. Use this tab (not Reconciliation) for day-to-day monitoring if you are an Admin.
Click Finance → Transaction Activity.
Keep Live ticked for auto-refresh during the event.
Filter by type: donations, manual loads, redemptions, harvest purchases.
Click Export transaction log CSV at end of day.
7.4 Reconciliation (Super Admin only)
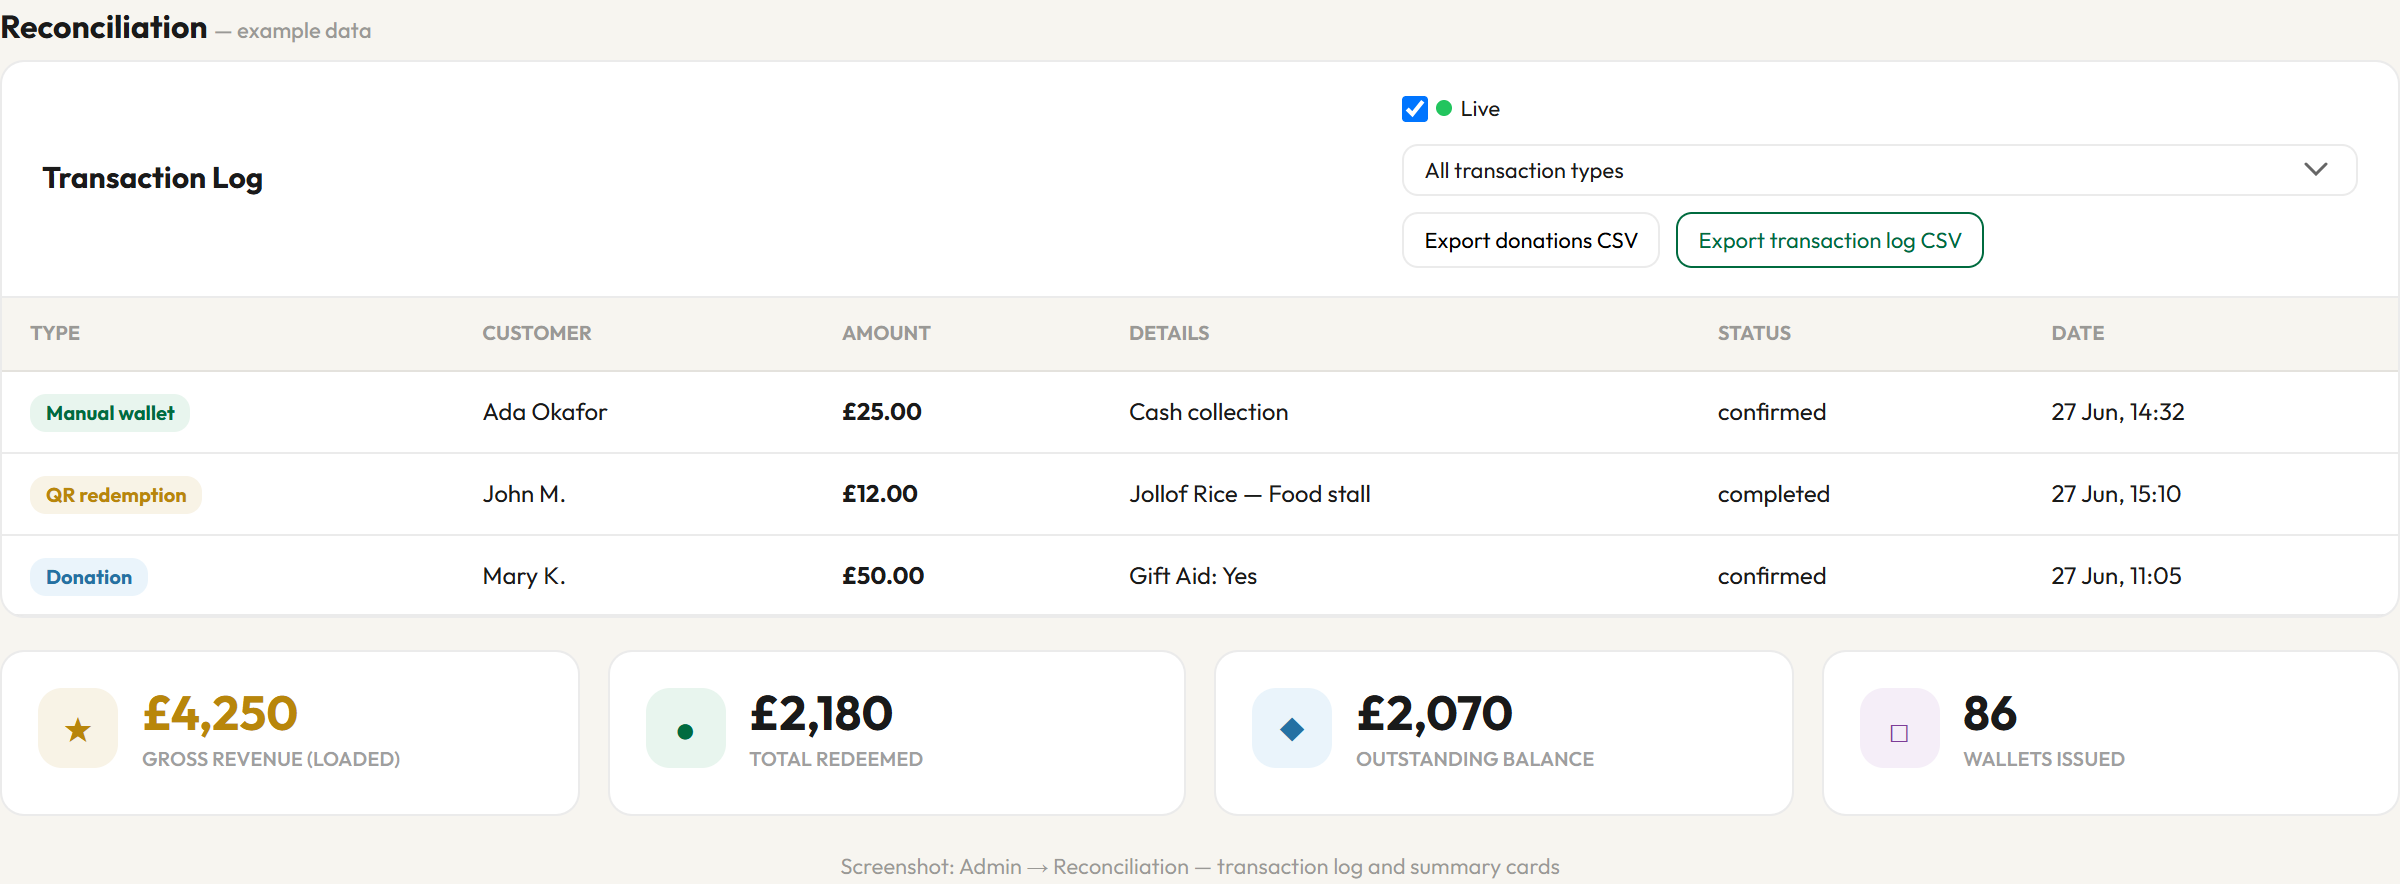
Figure 11d — Reconciliation dashboard (Super Admin). Summary cards show Gross Loaded, Redeemed, Outstanding, and Wallets Issued — aligned with Transaction Activity.
Card
Meaning
Gross Revenue (Loaded)
Total money loaded into all QR wallets
Total Redeemed
Total spent at vendor stalls
Outstanding Balance
Loaded but not yet spent (prepaid credit)
Wallets Issued
Number of QR vouchers created
7.5 Export reports (end of day)
Button
Who
What you get
Export donations CSV
Admin, Super Admin
Gift Aid audit file — Donations tab or Reconciliation
Export transaction log CSV
Admin, Super Admin
Full log from Transaction Activity (or Reconciliation for Super Admin)
Community tabs (Members, Contacts, Thanksgiving, Brochures) also have Export CSV where your role allows.
7.6 Look up any wallet (QR Admin)
Figure 12 — QR Admin (qr-admin.html). After login, search any wallet by token to view balance and full transaction history.
Go to qr-admin.html and sign in.
See all wallets: name, loaded, remaining, status, transaction history.
Use when customer says balance is wrong or email was lost.
8. Donations (separate from QR wallets)
Step
Who
Action
1
Donor
Go to donate.html
2
Donor
Choose amount; opt into Gift Aid if eligible
3
Donor
Pay by card (statement: NCC DONATION)
4
Finance
Export from Donations tab or Reconciliation → Export donations CSV
9. End-of-event checklist
Export transaction log CSV from Reconciliation
Export donations CSV (Gift Aid)
Record Gross Loaded, Redeemed, Outstanding figures
Count physical cash vs manual wallet loads in admin
Compare Stripe Dashboard to online payments
Resolve disputes via QR Admin
Confirm all vendors signed out
Archive CSV files for accounts
10. Common problems
Problem
Try this first
No QR after online payment
Wait 60s; refresh success page; check QR Admin
Insufficient balance at stall
Customer checks voucher.html
QR not found
Copy full code; search in QR Admin
Vendor cannot log in
Super Admin resets password
No internet at stall
Mobile hotspot or admin desk helps customer
Wallet not active / payment pending
Virtual load — customer must wait for admin confirmation
Top-up not showing on balance
Refresh voucher.html; minimum £1 for online top-up
Wallet reads £0 but customer says they paid for an item
Scan anyway — pre-paid items appear in the green list and fulfill at £0
Pay from wallet button disabled at checkout
Balance below cart total, or wallet payment still pending — top up or confirm payment first
Support: info@nccglasgow.org.uk
11. Who can do what (July 2026)
Task
Super Admin
Admin
Manager
Vendor
Reconciliation & full finance summary
✓
—
—
—
Transaction Activity & export CSV
✓
✓
—
—
Donations tab & export
✓
✓
—
—
Load wallet at cash desk (Wallet Top-Up)
✓
✓
—
—
Virtual load & share QR
✓
✓
—
—
Vendor Operations (cross-stall stats)
✓
✓
✓
—
QR Wallets / Redemption pages
✓
—
✓
—
Settings, Users, Audit Log
✓
—
—
—
Community tabs (members, brochures…)
✓
✓
partial
—
Verify / redeem at stall
✓
—
✓
✓
Delete records
✓
—
—
—
See own stall history only
—
—
—
✓
12. Practice before event day
Run this once with a small payment (e.g. £1):
Customer: Pay £1 on harvest.html (Load Wallet).
Vendor: vendor.html → scan QR → tap £1 item.
Finance: Check Reconciliation for purchase and redemption.
Customer: Top up existing wallet on harvest.html (from £1) → same voucher code shows higher balance on voucher.html.
Admin: Virtual load £5 → share QR → confirm cannot redeem at stall → confirm payment → redeem works.
Customer: With remaining credit, buy a small catalogue item at checkout using Pay with my QR wallet → vendor scan shows it under Pre-paid items → tap tile fulfills at £0.
If all steps work, the system is ready for event day.